Video Thumbnail: Magically Remove Glare from Glasses in Photoshop!

How to “magically” remove glare from glasses in Adobe Photoshop, with PiXimperfect

April 8, 2024

Maybe you’ve been using Adobe Photoshop for a while, or maybe you’re just getting started. There are many ways to do every type of edit in the software, as well as all kinds of tips, tricks, and hacks to do things more simply and easily. 

Unmesh Dinda, the creator behind PiXimperfect, is known for tutorials featuring some of the most dramatic and striking transformations possible with Adobe Photoshop — such as previous tutorials we’ve featured on this blog including Turning Day into NightCutting Out Hair From A Busy Background, and Making it Snow in Summer.

While eyeglasses help people see the world better, they also make it harder for the world to see one of the most important features of a subject — their eyes. In the below video and tutorial, Dinda shows you how to “magically” remove the glare from glasses in photos in Adobe Photoshop. Watch the video or read on to see how he does it.

The absolute best way to fix glare is through using two photographs of the subject in the same position, with and without glasses, and overlaying them in Adobe Photoshop. But if the only image you have has some detail around the eyes, we can make it work. Otherwise, removing glare from glasses in Photoshop is impossible when the eyes are entirely obscured.

For the past three years, I’ve relied on the Wacom Intuos Pro medium, which has accompanied me on numerous journeys worldwide. We’re gonna be doing a lot of dodging and burning, and the kind of precision and speed that we need for this is gonna be very hard to achieve with a mouse. Using Wacom’s drawing tablet for employing techniques used in this tutorial makes it an invaluable tool.

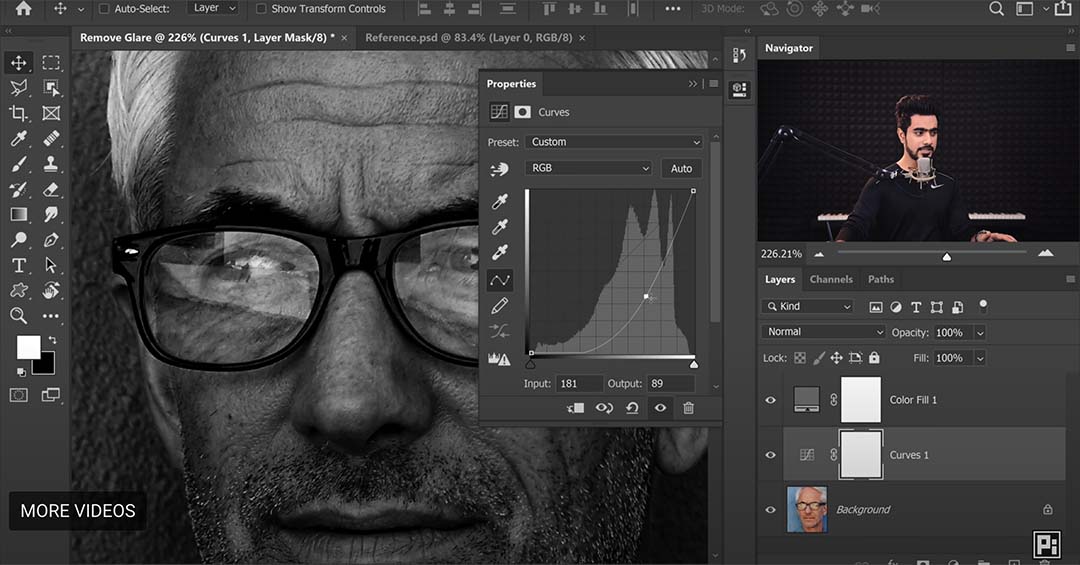
First we should desaturate the image, so its color doesn’t distract us from matching the brightness. Create a Solid Color adjustment layer, select a color with zero saturation, and set the blend mode to Color.
LensGlare 02

Next, let’s correct the brightness using curves. Create a curves adjustment layer, adjust the middle node downwards until bright areas appear natural, then invert (Ctrl/Cmd+I) the mask selection. Before the mask was white, and now all of it is black – this means changes will only show up on areas we paint white. Use a soft round brush with low flow to paint white on areas requiring adjustment.

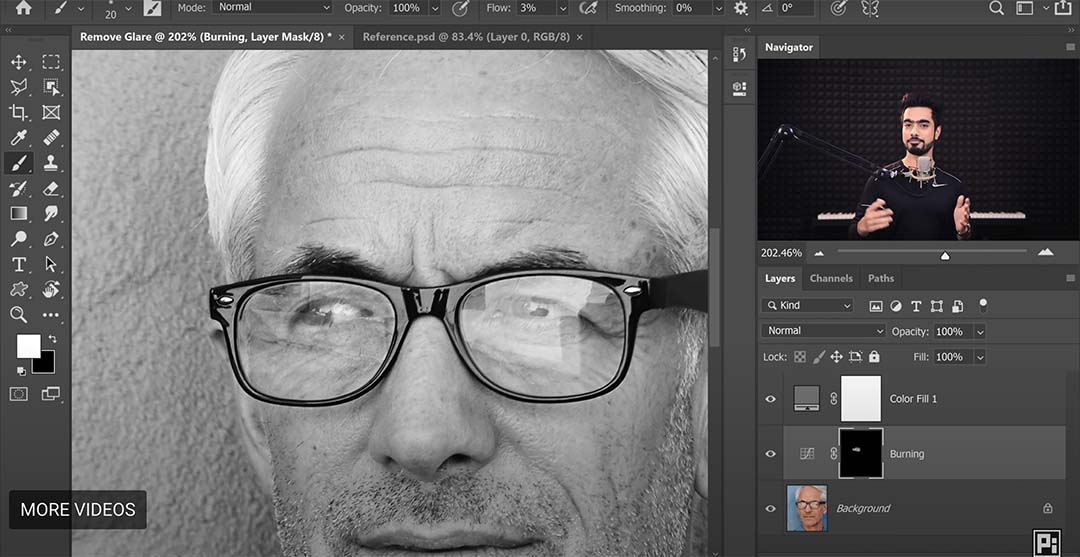
Start painting. If you have practice and a tablet, this process will be faster than you think. Don’t worry about the glare edges, our focus right now is to use a basic burn to match the brightness. 
LensGlare 03

For further refinement, create additional dodging and burning layers to enhance results. Use an empty layer with Soft Light blend mode and adjust brush flow between 1-2 percent for precision.

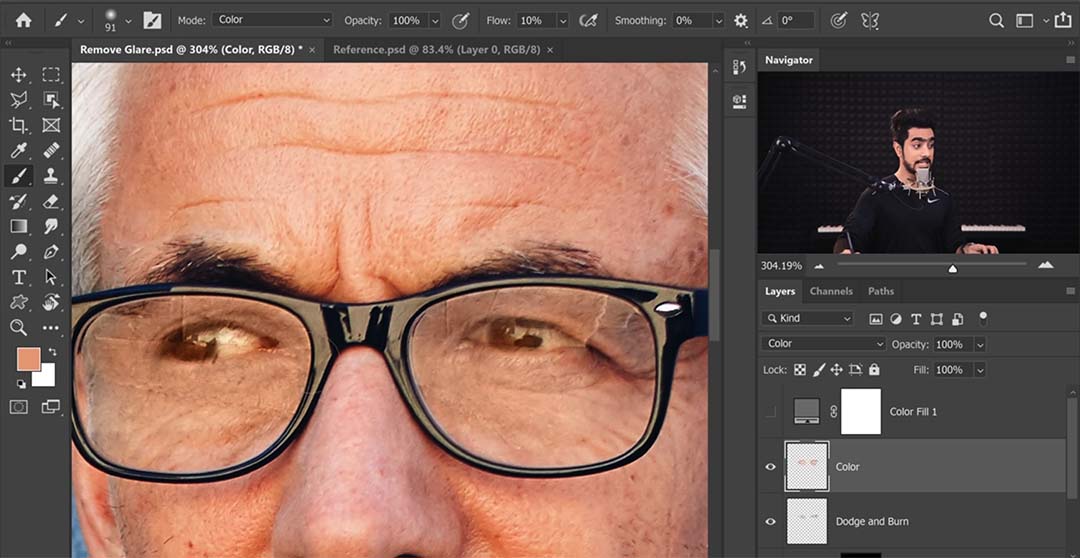
Next we must match the glare color to the surrounding image. If you disable the desaturation, you’ll see the colors don’t match at all. Easily fix this by creating a new layer, choosing a brush with 5-10 percent flow, and setting blend mode to Color. Use the eyedropper tool to sample nearby colors and paint over mismatched areas.
LensGlare 04

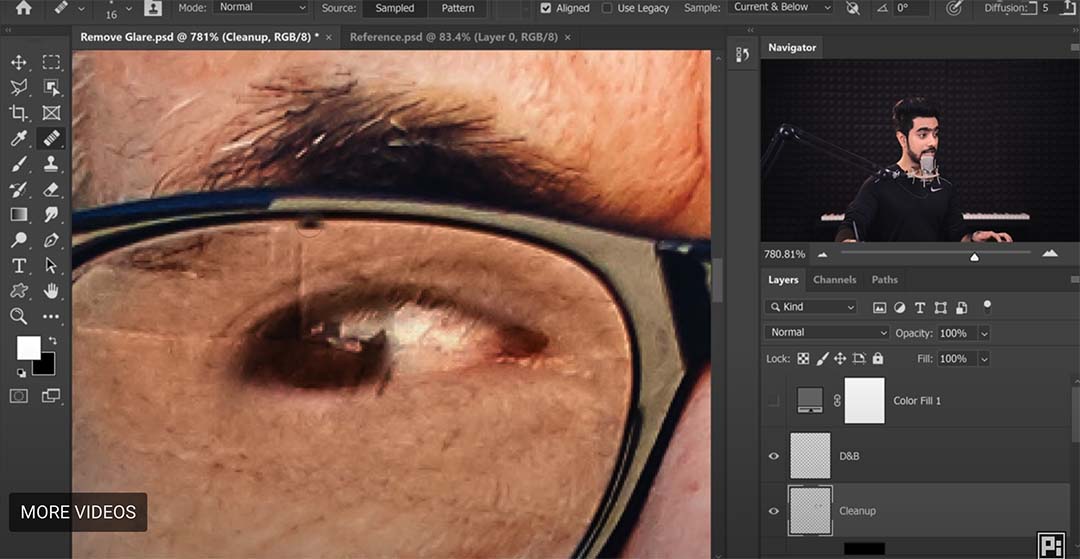
Darken the eyes using another curves adjustment layer, focusing on eye areas and painting with white on the inverted mask. Now, the last thing we need to fix are glare edges. Create a new layer and use tools like the Healing Brush or Spot Healing Brush to fix imperfections. 

Keep in mind the Stamp tool doesn’t work on an empty layer, so we’ll have to create a visible layer for it. Ensure alignment of spectacle edges by sampling adjacent areas and painting carefully. For other areas, create another dodge and burn layer with a soft light blend mode.
LensGlare 05

To avoid overcorrection, maintain natural features by adjusting layers as needed. If desired, retain a hint of glare by grouping adjustment layers and reducing opacity.

To recap: First, match brightness using curve and dodge/burn layers. Second, correct colors with a Color blend mode layer to sample from surrounding areas and paint to match. Third, clean the edges with tools like Clone Stamp, Healing Brush, and Spot Healing Brush. Continuously adjust layers to maintain natural appearance throughout the editing process.

And that’s it! Let’s take a look at the before and after:
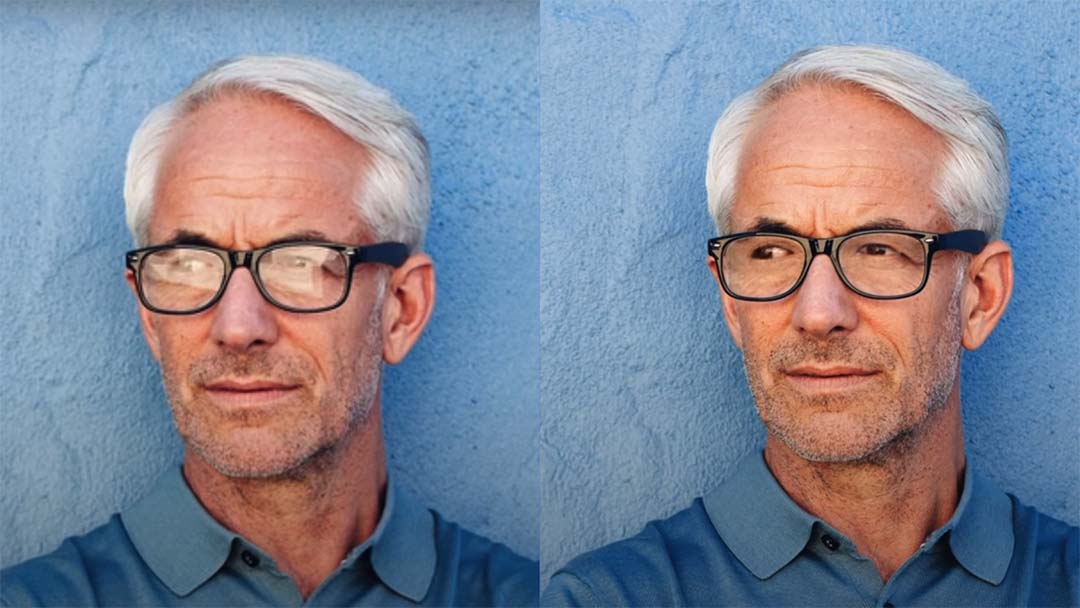
LensGlare 01

Unmesh Dinda from PiXimperfect

About PiXimperfect

PiXimperfect is one of the premier free online resources for learning Adobe Photoshop and Lightroom. With over five million subscribers on YouTube, it’s clear that his high quality tutorials are some of the best.

Related posts:

Making the Most of Your Wacom with Pablo Muñoz Gómez, Tip 7: Mapping ExpressKeys to Custom Functions

Making the Most of Your Wacom with Pablo Muñoz Gómez, Tip 7: Mapping ExpressKeys to Custom Functions

The best storyboarding classes on Skillshare

The best storyboarding classes on Skillshare

Making the most of your Wacom, with Pablo Munoz Gomez – Tip 6: Creating Advanced Radial Menus

Making the most of your Wacom, with Pablo Munoz Gomez – Tip 6: Creating Advanced Radial Menus

Making the most of your Wacom, with Pablo Munoz Gomez – Tip 5: How to use ‘Precision Mode’

Making the most of your Wacom, with Pablo Munoz Gomez – Tip 5: How to use ‘Precision Mode’

Connect with Wacom on social media

The lovely @martinab.illustrations tests the Wacom Movink, taking advantage of the ability to create from anywhere. From your desk, to the cafe, and anywhere ideas may strike, Movink moves with you, so you never stop creating. 
#wacommovink #creativeprofessionals #creativesonthego #digitalart #artschool
180 10
💡 What is Wacom Bridge?⁣
It's a technology designed to give artists a like-local experience on remote systems, seamlessly integrating local Wacom tablets with AWS solutions like Amazon DCV and Amazon AppStream 2.0.⁣
⁣
With the demand for distributed creative talent growing, Wacom Bridge ensures that creatives can thrive wherever inspiration strikes—studio, home, or halfway across the globe! 🌍⁣
⁣
🚀 Learn more through the link in our bio!⁣
AWS users can enjoy Wacom Bridge at no cost until January 15, 2026 (terms apply).⁣
⁣
#WacomBridge #RemoteWork #DigitalCreativity
87 0
Don't you love how easy @tedslittledream makes it look?
Check out his process on the new #wacommovink ✍️
Ted uses Wacom gear and #photoshop to edit all his concept art.
#madewithwacom #wacomtablet #conceptart #digitalartist #artistsoninstagram
745 14
Do you still draw with a mouse? 🖱️😱🚫
@adam_theillustrator prefers the precision of a stylus and the Wacom Intuos Pro is his trusty ally. 
Feels like paper. Works like magic. 
#intuospro #wacompen #wacomtablet
657 62
It's CYBER MONDAY! ⁣
Save big on Wacom #IntuosPro, our legendary beloved pro tablet!⁣
Perfect for photo editors who need more precision for tracing out masks or layering, illustrators who want the efficiency of working digital rather than scanning and cleaning up hand-drawn work, or a concept artists ready to take advantage of the power of digital painting software. ⁣
⁣
Shop now through the link in our bio!⁣
#christmasgifts #holiday #deals #shopping #amazon #wacomsale
98 2
Creating magical vibes with @monsieur_arefin. ☕📔🫗
Sometimes it takes several tries to capture what you envision. And every try reveals something different and special. 
Stay tuned for part 3.
203 4
When you do it all, you need a tool that can keep up. 🖌️🎬🎨📸🎥🎤
@nickhshaheen found a versatile way to work on the go with the #WacomMovink. The perfect tool for creatives who do it all.
Are you also a studio of one?
146 1
The Wacom Movink is on sale on our Amazon store 🖤🎁🛒⁣⁣
Save $50 USD on our lightest and thinnest pen display ever!⁣
Head to the link in our bio or our stories to save! ☝️⁣
Work and workspace by @danidiamondphotography 📷
#christmasgifts #holiday #deals #shopping #amazon #wacomsale #wacomMovink ⁣
1521 30
🌍 Hey, Wacom community! you already know @wacomeurope — and now we want to get to know You better!

Drop a comment below and tell us:
📍 Where from Europe are you following us?
✨ What do you do? (Are you an artist, designer, photographer, vfx artist, or anything else?)

Let’s build this incredible European creative community together! 👇✨ Don’t forget to tag your creative friends to join the conversation!

#WacomCommunity #CreativeCommunity
272 174
Do you know what the #greasepencil tool is? Let's learn with @janice.journal ✍️🧋
Janice is using a #WacomOne 12
Shop #WacomOne on sale now! Via link in bio 🛒
#wacomtips #wacomart #3dmodeling #3dart #digitalart #madewithwacom
518 4
Add a dash of magic to everyday moments🫖⏱️🥃🥄🃏✨
Our friend @monsieur_arefin shows us that sometimes all we need is already around us. Look around and reimagine the ordinary.
It's amazing what a glue gun and some editing can do 😍
Stay tuned for part two! 2️⃣✌🏾
#madewithwacom #photoediting #artistlife #artistsoninstagram #inspiration #ConnectedInk2024
390 11
Today @aaronblaiseart takes us through the process of how he animated Snowbear. From story boards and rough animations to adding color and more. 🐻‍❄️
Head to Wacom's YouTube to watch the full video and get a glimpse of what it's like to animate an entire short film on your own! 
#animation #2danimation #aaronblaise #MadeWithWacom
679 14
This error message is only visible to WordPress admins
There has been a problem with your Instagram Feed.