Proko is a hub for artists to improve their skills and connect with a community of like-minded peers and talented mentors. They provide a wide variety of online courses that can be beneficial for both digital and traditional artists.
If you’re just getting started with digital painting, learning how to use layers is crucial. To learn how to use layers for digital painting in Adobe Photoshop, watch the video or read the article below.
Not only are layers useful for making your workflow faster and more efficient, but they also make your artwork more valuable to clients in many industries. Having different elements of your painting separated onto their own layer can be a requirement, so getting comfortable painting with layers is really important.
The layers palette
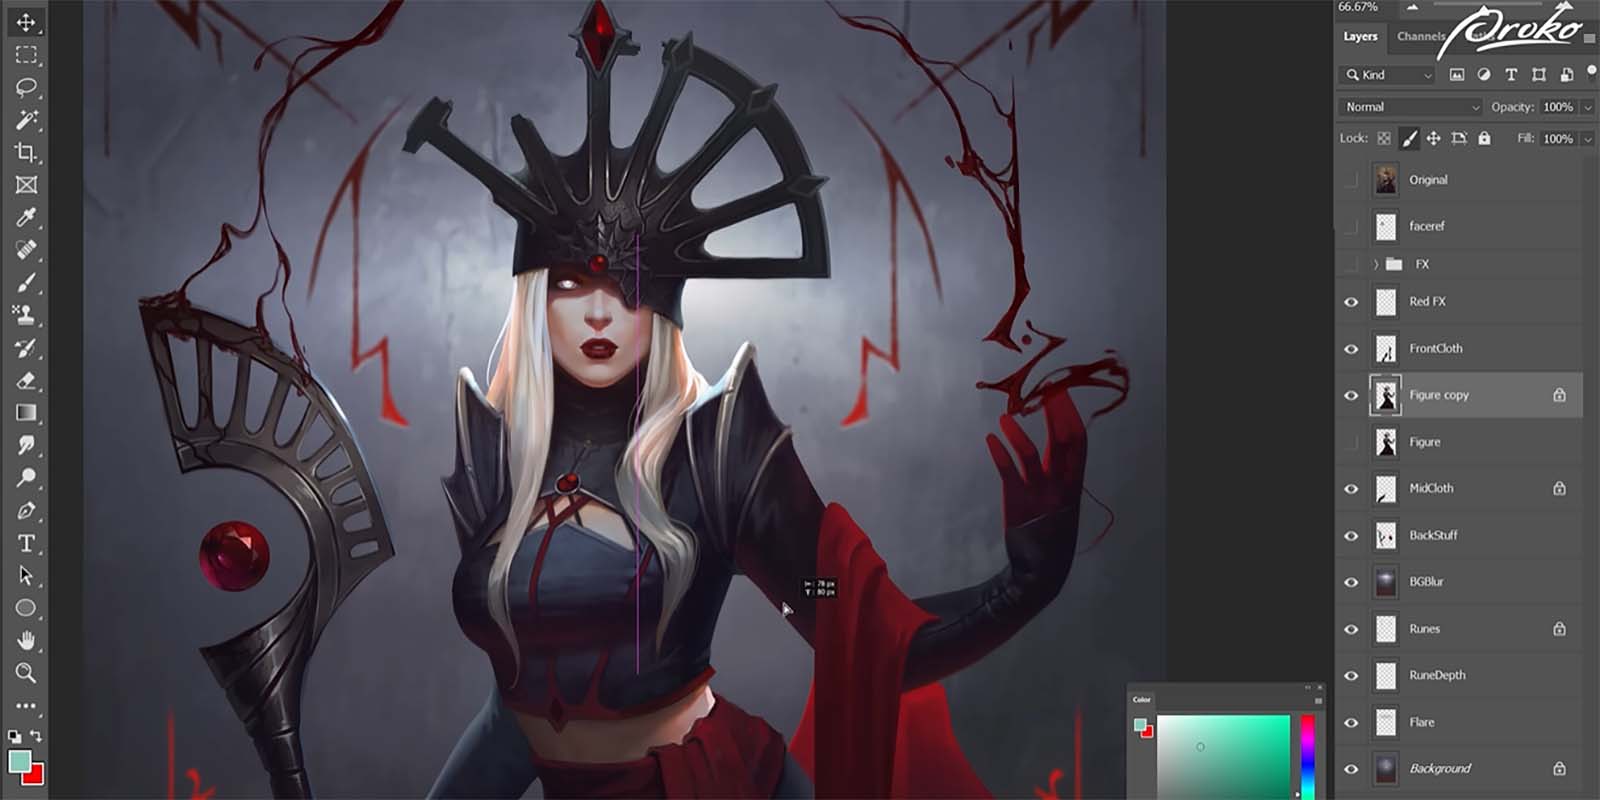
In the bottom right hand corner of Adobe Photoshop, you’ll see your layers palette. If you don’t see it, you can go up to the Window dropdown menu and click Layers to make it visible. This window shows all the layers that exist in your .psd file and you can scroll through the list with the scroll bar or your scroll wheel.
Pretty much every digital painting software has a similarly styled layers palette, so if you’re using Procreate or Clip Studio Paint, don’t worry. Most of this lesson is still relevant.
Layer basics
Every Adobe Photoshop file comes with a default background layer. This layer is slightly different from other layers as it does not support transparency and will always be the exact dimensions of your canvas. We personally like to use this layer as the base for backgrounds in paintings as it reduces chances of artifacting around the edges of the canvas if the image is later resized.
If you delete your background layer and want to get it back, you can create a new one by selecting any layer and going to Layer > New > Background from layer.
To create a new layer click on the New Layer button at the bottom of the palette or press Cmd/Ctrl+Shift+N. This will open a dialog box where you can name your layer and assign some basic parameters like blending mode and opacity.
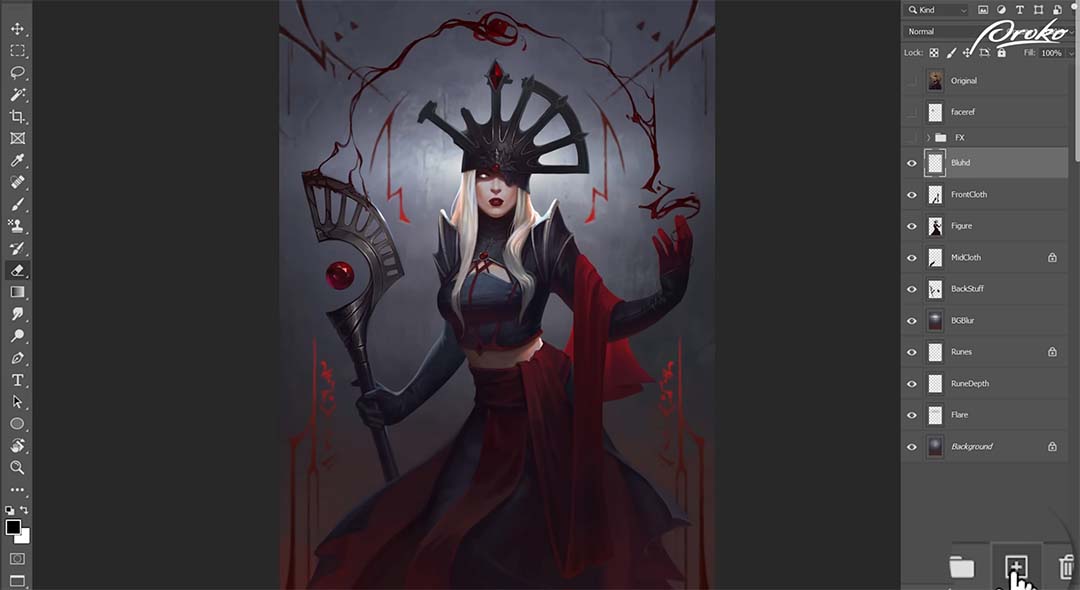
It’s really important to get in the habit of naming your layers. If you always name your layers you’ll save yourself and your clients a lot of headache over the course of your career. Also not everyone knows this but every time you name a layer, a puppy gets a belly scratch.
Once your new layer is created you’ll be able to see it in the layers palette. Note that new layers will appear above whatever layer you previously had selected. You can delete a layer by selecting it and pressing Delete or by dragging it to the trash can at the bottom of the layers palette. If you want to duplicate a layer you can press Cmd/Ctrl+J or drag your existing layer to the new layer icon.
Layer functions and parameters
Now that we have a layer to work with, let’s explore its functions and parameters.
The name of the layer is displayed to the right of the thumbnail. You can double-click on it to rename your layer. To the left of the name is a thumbnail that displays the contents of that layer. You can Cmd/Ctrl+Click on a layer’s thumbnail to select all the pixels on that layer. On the far left of each layer is an eyeball icon. You can click this icon to toggle the visibility of that layer on and off.
Clicking and holding down while sliding left and right on the opacity will control the opacity of the layer as a whole, while maintaining the relative opacity of the pixels on the layer. So if you have a layer that has a 100 percent opacity brush stroke and a 50 opacity brush stroke, reducing the layer’s opacity to 50 will cause the 100 opacity brush stroke to become 50 opacity and the 50 opacity brush stroke to become 25.
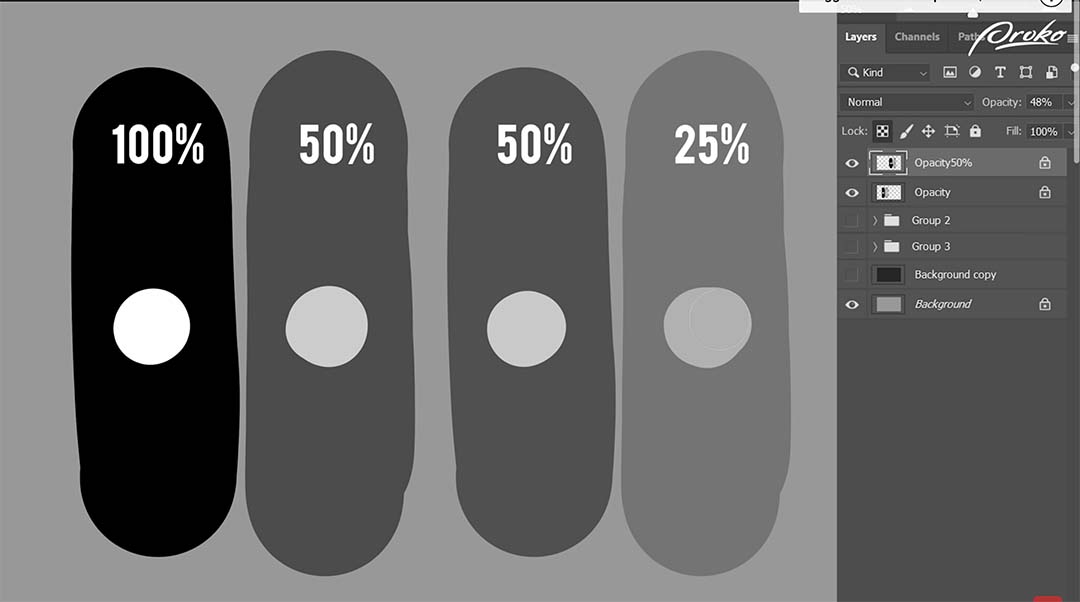
Fill is similar to opacity but does not affect layer styles. For instance, if we paint on a layer then add a stroke style to the layer reducing the fill will reduce the opacity of the pixels, but not the stroke.
At the top of the layers palette is a dropdown box that allows you to set a blending mode for your currently selected layer. We’ll explore what all these modes do in the premium course at Proko.com so for now just know that they’re here.
Under the blending mode drop-down is a collection of locks that allow you to limit what actions can be performed on the layer. The transparency lock locks the existing opacity of all pixels on the layer allowing you to paint only on pixels that already exist, rather than adding new ones. The opacity of the pixels is preserved so painting over a 50 opacity brush stroke will change the color but not the opacity. This is the most useful lock for painting and we’ll explore some great ways to use it in future lessons.

The pixel lock locks all of the pixel content on the layer, meaning you can no longer paint on it but you can still move it with the move tool or transform it with the transform tool.
The position lock is the opposite of pixel lock. This will allow you to paint on the layer, but you are no longer able to move or transform the layer.
Finally, lock all will lock the layer entirely, meaning it cannot be edited in any way until the lock is disabled. Note that you can use forward slash (/) to toggle locks on and off. Whatever lock you used last will be the lock that toggles with this hotkey. We recommend binding this to your tablet buttons.
If you double-click on a layer’s thumbnail it will show you a full set of that layer’s options as well as layer style options. Most of this is beyond what we’ll need for digital painting, but we will go through some of the layer styles in a future lesson as they have some niche use cases.
Right-clicking on a layer displays a whole variety of options and at the bottom of these options you can set a color for the layer in the palette. This can be useful for visual organization as well as filtering. Note that if you apply a color to a group all the layers in that group will automatically adopt the same color.
At the very top of the layers palette is a set of filtering options. Clicking the dropdown will allow you to filter layers by a whole variety of parameters. You can hide layers in your palette that don’t have that parameter to quickly find a text layer in your document, or to display only layers with a certain color applied to them. For example, we often like to tag all special effects layers as purple, and if we ever need to see the image without the effects, we can simply filter by the purple color and disable all those layers.
To the right of the filter drop-down are a selection of quick filters allowing you to filter by layer type. At the far right is an on/off toggle so you can assign a filter that you like and turn it on and off as needed.
Merging layers
As you progress with digital painting, you’ll probably end up using more and more layers for various reasons. Some of these layers you’ll want to keep separated, but a lot of them might become unnecessary, and you can consolidate them together by merging. You can also merge multiple layers together to clean and consolidate your layers palette.
You can press Cmd/Ctrl+E to merge your currently selected layer with the layer below or you can select a group of layers and press Cmd/Ctrl+E to merge them all into one.
When merging layers together be mindful of any blending modes that you’ve used. A single layer can only have one blending mode at a time. So if you merge two layers together that have two different blending modes you might not get the result you expect. At this point you can probably see that layers are really useful for a digital workflow: they allow you to manage your painting and control your process in an efficient way.
Layer groups
Depending on the kind of project you’re working on, you might end up with dozens or even hundreds of layers in a single painting. Groups allow us to organize our layers in meaningful ways that can be really useful for both us and our clients.
You can create a new layer group by clicking the folder icon at the bottom of the layers palette, which will create a new empty group. You can also press Cmd/Ctrl+G which will create a group and add your currently selected layers to that group. You can move layers in and out of groups by dragging and dropping.
Note that groups have the same parameters as individual layers so you can change the opacity of a group or change its blending mode which will apply to all the layers within the group. Remember puppies need lots of belly scratches so name your groups as well as your layers.
Clipping masks
Clipping masks lock the transparency of one layer to the pixels of the layer below it. It’s similar to using the transparency lock but in this case anything you paint is preserved on its own layer. This is a fantastic way to perform non-destructive editing which has an infinite array of possibilities.
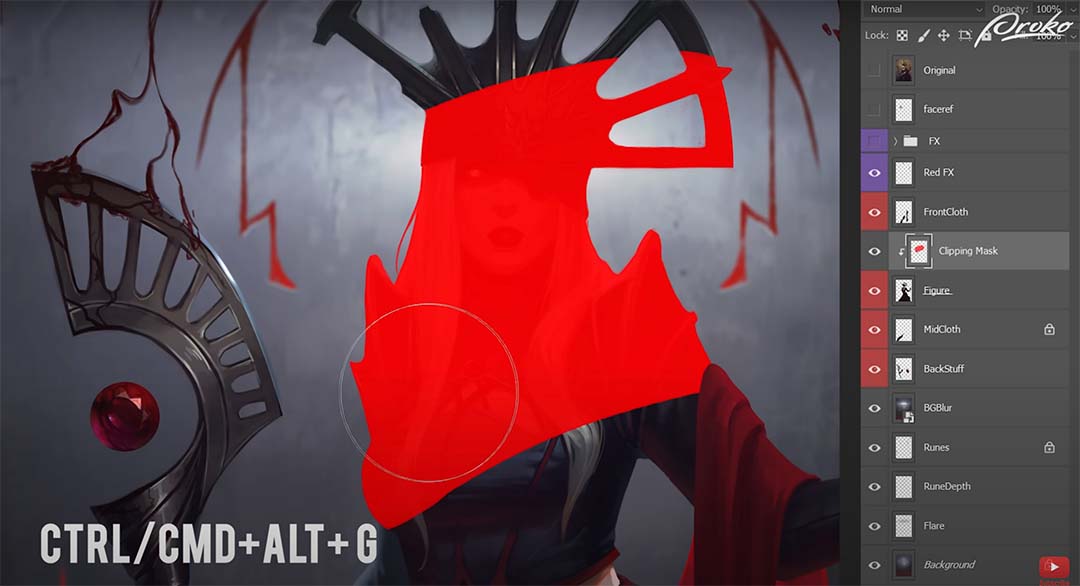
To create a clipping mask you can press Cmd/Ctrl+Alt+G which will clip your currently selected layer to the layer below. You can also create a clipping mask by holding Alt and clicking in between two layers.
Here’s a few common ways to use clipping masks:
If you’re working on cell-shaded artwork, you can do your flat colors on one layer then paint your shadows with a multiply layer clipped to the flat colors. This allows you to paint your shadows in isolation, and if you need to change the flat colors underneath, you don’t have to repaint your shadows.
You can also use clipping masks for safe experimentation. If you have an area of your painting that you like but want to maybe try something else, you can create a new layer and clip it to the original layer. Then try your edits on the new layer. If you decide you like the results of your experiment you can merge it with the original layer. If not you can just delete the clipped layer and go back to where you were before.
You can also use clipping masks to separate complicated elements like keeping a trim or pattern separate from the fabric underneath. You can also apply clipping masks to groups allowing you to make large scale adjustments to a whole stack of layers very easily.
There’s a lot you can do with clipping masks. The examples we’ve shown here are just some of the most common ones, and don’t worry if this seems a little confusing right now as we’ll show you some very practical ways that you can use these later on in the course.
Layer masks
The last key feature available to us is layer masks. They allow you to control the opacity of a layer’s pixels without editing or losing the pixels themselves.
To create a layer mask select the layer you want to mask then click on the layer mask icon. This will create a second thumbnail on your layer that shows the mask. You can click between these two thumbnails to change your painting mode between the layer and the mask. The way this works is that Adobe Photoshop interprets white pixels as fully opaque and black pixels as fully transparent, with the range of grays in between being various levels of opacity.
So if I want to make this weapon look like it’s being held in the hand I can create a layer mask on the weapon layer and simply paint with black where I want the weapon to be transparent.

If you want to see your layer without the mask, you can right-click the mask thumbnail and choose Disable Layer Mask.
If you want to remove the layer mask, right-click and choose Delete Layer Mask.
If you want to apply the layer mask’s transparency destructively to your layer’s pixels, right-click and choose Apply Layer Mask.
Finally, you can click on the chain icon in between the layer thumbnail and the mask to unlink the mask from the pixels. This allows you to move each part independently, which in this case allows us to change the position of the staff without having to repaint the mask for the hand.
As you can see, layers and groups are powerful and versatile tools that make digital art highly appealing to both artists and clients. You can use them to speed up your workflow, organize things in a useful way, edit things non-destructively, and deliver a highly professional and usable image to your client.
