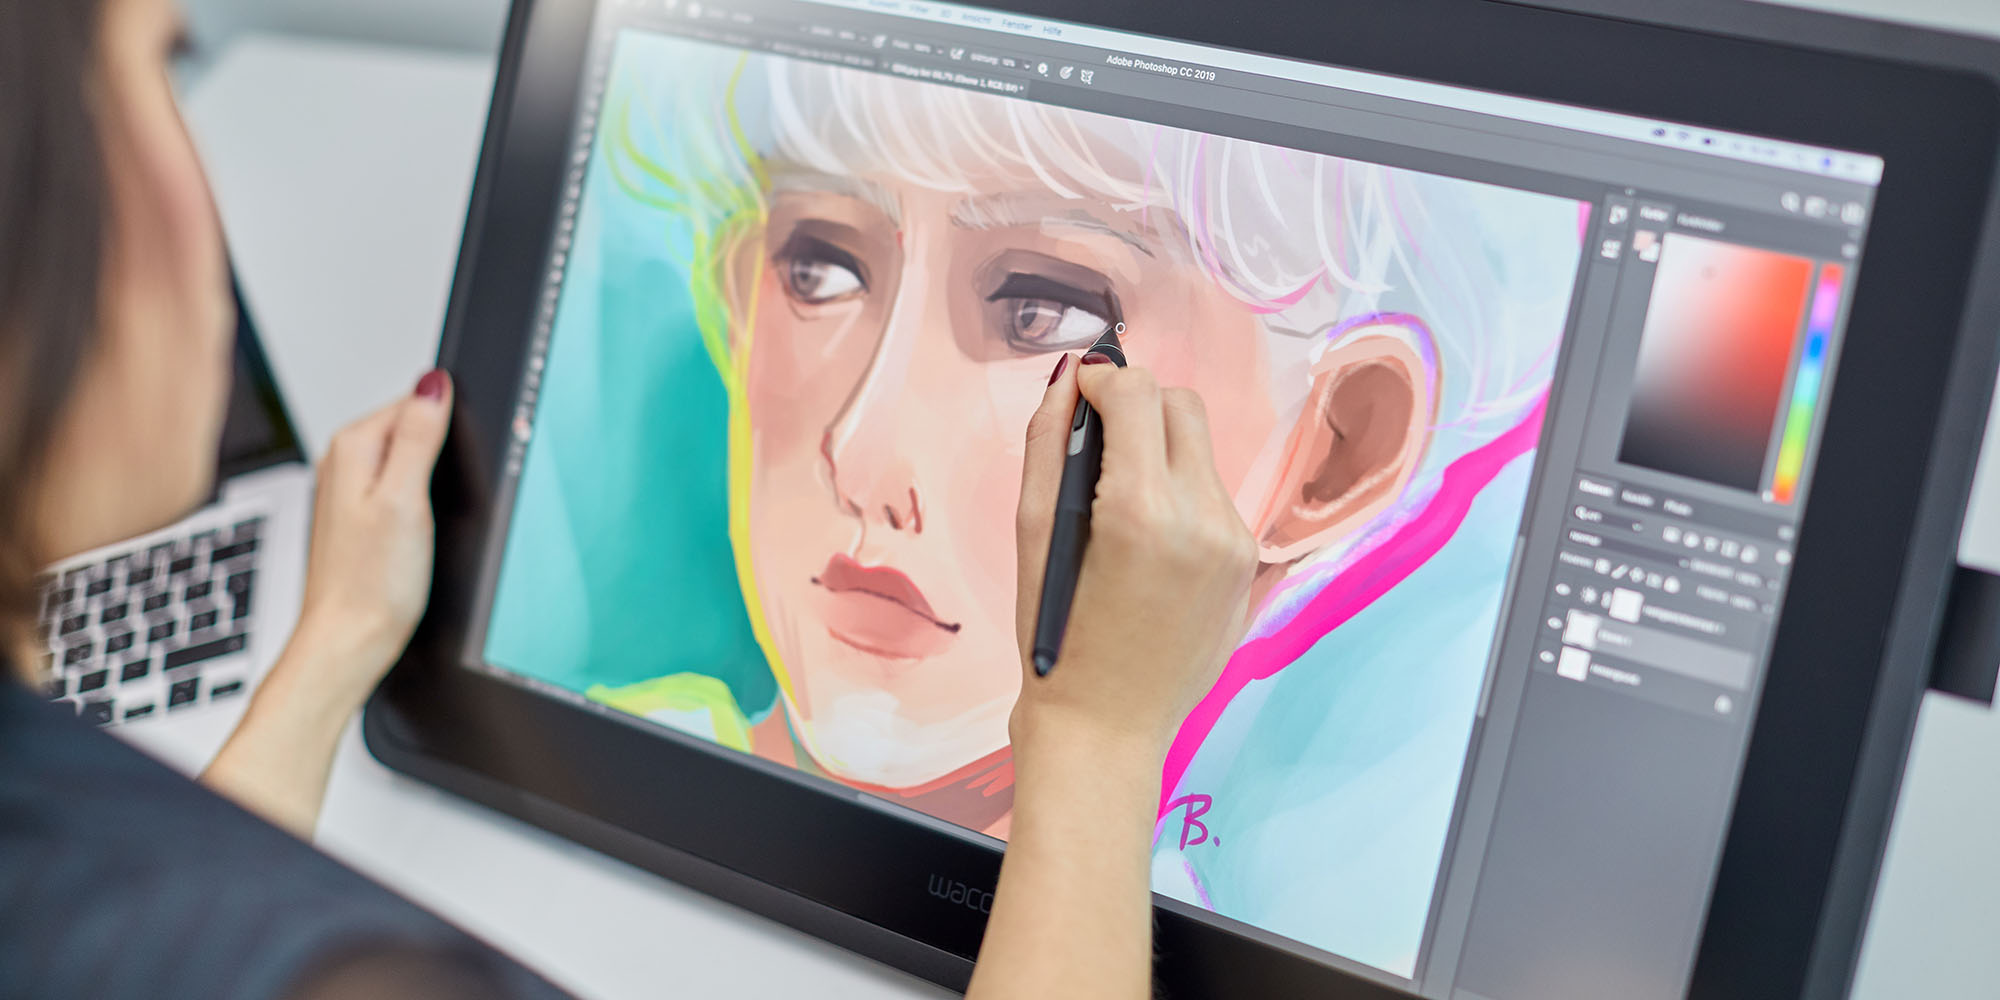
If you’re just getting into creating digital art with Adobe Photoshop and your Wacom device, or have been using them for a while but want to deepen your understanding of how Photoshop works so you can level up your artistic practice, this guide is for you.
Over this four-part series, you’ll learn everything you need to know about Adobe Photoshop Brushes. From the basics, including the Photoshop toolbar and how brushes work, to the different kinds of brushes available, to how to manipulate them and change their settings for different results, and finally to creating your own custom brushes.
- The Toolbar (You are here)
- Types of Brushes
- Brush Settings Panel
- Making Your Own Brushes
This article is Part 1, which will walk you through the most basic knowledge of brushes and create a strong foundation. The table of contents above will be updated as each part publishes. Let’s start with the most basic topic of all:
What is a brush?
Photoshop imitates the fundamentals of traditional media by taking a single image — called a Brush Tip — and replicating it, usually by layering it over itself to create the illusion of a single stroke.


Clicking the brush icon, or pressing B (if you still have the default hotkeys), will open up the Brush Options Toolbar. From there, can assign the tip a color with the Color Picker — and so much more. The Brush Options toolbar lets you change all of your brush tip settings.
Brush options toolbar
Here’s what the Brush Options Toolbar looks like in Photoshop 2022.

Yours may look slightly different if you have an different version of Photoshop, but everything should be almost exactly the same.
1. Tool presets

This is the multi-tool shortcut menu. If there are certain tools you use often with the same settings, you can save them here. Click here to watch a video from Adobe that explains in depth how this works.
2. Brush preset picker
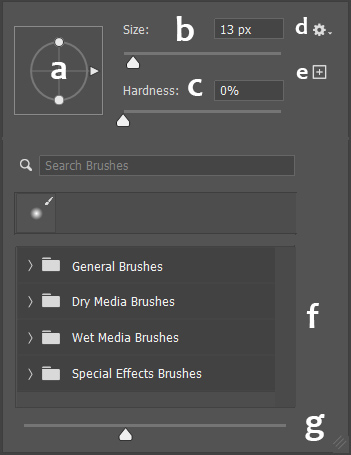
This is where you’ll do most of your brush selection and adjustment on-the-fly while you’re drawing or painting.
A: Angle and roundness
This adjusts the tilt direction and height-to-width ratio of the brush tip. You change the angle by rotating the arrow, and the roundness by dragging the anchor points in or out.
B: Size
Adjusts the size of the brush tip. There are also hotkeys for doing this — by default it’s the bracket keys or by holding Alt/Option and dragging. Most users of Wacom devices use pressure sensitivity to adjust brush tip size, however — more on that later.
C: Hardness
For round brushes only: This increases or decreases the sharpness of the tip’s edges. Hard brushes, especially at high flow, create a drawing effect, whereas soft ones, especially at low flow, are best for smooth blending. You can also control it with shift + brackets if you have default hotkeys.
D: Settings
The menu behind this gear has changed a lot in recent versions of Photoshop. Here are the current ones for 2022:
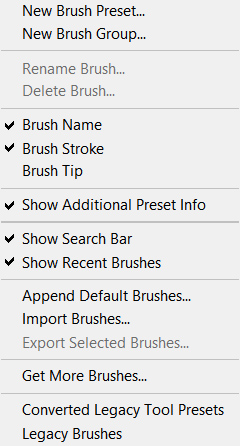
Some of these are just toggles for the preset picker. Here’s a breakdown of the rest:
- New Brush Preset: See above.
- New Brush Group: Creates a new folder for sorting brushes.
- Rename Brush: Use this to name brushes so you can search by name and find them easily.
- Delete Brush/Delete Group: If you want to be safe, make sure you back your folder up as an ABR first.
- Append Default Brushes: This adds the default brushes onto the end of your brush panel.
- Import Brushes: This loads up a brush set you’ve downloaded to your hard drive. Brushes are saved as ABR files, each of which is a group containing one or more brushes Imported brushes will be appended to your brush panel as well.
- Export Selected Brushes: If you select a handful of brushes or a folder, this will pack them into an ABR so you can back them up.
- Get More Brushes: This takes you to Adobe’s brush packs page. They have a huge variety of free options, but it’s recommended that you learn more about the basics first.
- Converted Legacy Tool Presets: This one’s not helpfully named, but it’s the same thing as the legacy brushes option below, except it imports the default tool presets into the Presets window.
- Legacy Brushes: This appends all the default brushes from previous versions of Photoshop, giving you about a hundred times more than 2022’s defaults. Once again, it’s recommended that you hold off until you have a little more experience.
E: New Brush Preset
We’ll be covering custom brushes in Part 2.
F: Brush Picker
This is where you choose a brush. Photoshop 2022 comes with just four folders of default brushes, most made by Kyle T. Webster: General brushes, which are your Round Brushes; Dry Media Brushes, your pencils and charcoals; Wet Media Brushes, your paints and inks; and Special Effect Brushes, which are actually a mix of splatter and texture brushes. But you can add more with the Legacy Brushes option in the settings menu.
G: Slider
This controls the size of the preview in the brush picker. Older versions of Photoshop will have a Reset Brushes option that returns the panel to its default appearance. They took that away, so if you want the panel back to default for a fresh start, you’ll have to highlight all the folders you want to remove with Shift, then Right Click > Delete Group.
3. Painting Mode

Just like layers, brushes have blending modes. “The blending mode … controls how pixels in the image are affected by a painting or editing tool,” according to Adobe in this article, which goes into depth on how this works.
The main difference between layer and brush modes is that the latter are destructive, meaning once they’re applied, you can’t change them. They can be more convenient to change dynamically, however.
Brushes have two secret modes layers don’t, however:
- Behind lets you paint only on the transparent, unpainted, parts of the layer. If you paint over another line, it’ll pass under it.
- Clear turns any brush into an eraser. All of Photoshop’s default brushes are locked to one tool, usually, either the Brush or the Mixer Brush, and the process of getting them to work with the Eraser tool is complicated (more on this in Part 4), so this is the easiest way.
4. Opacity and flow

Opacity and Flow are the two ways to control stroke transparency for blending. They’re what make digital painting possible.
A lower opacity number means your brush strokes will be more transparent, and a higher number means they will be more opaque. You can set this by typing in any number from 1 to 100 with the brush tool open, or set it in 10% increments with just 1 to 9. 0 resets it to 100%.
Flow is more complex. It’s intended to better mimic traditional paint: think of it as a smoother version of opacity made just for painting. With opacity, each stroke lays down one “coat” of paint at that exact opacity until you lift your Wacom pen. No matter whether you cross your previous lines or not, that coat won’t get any more opaque until you end that stroke and draw a new one, and there will be an obvious separation between the two, like stacking pieces of colored glass on top of each other.
Flow is different. A low-flow stroke will still be partially transparent, but the “coats” of paint you apply will build up into a solid color more smoothly, and whether or not you lift your stylus, crossing your stroke will darken or lighten it.
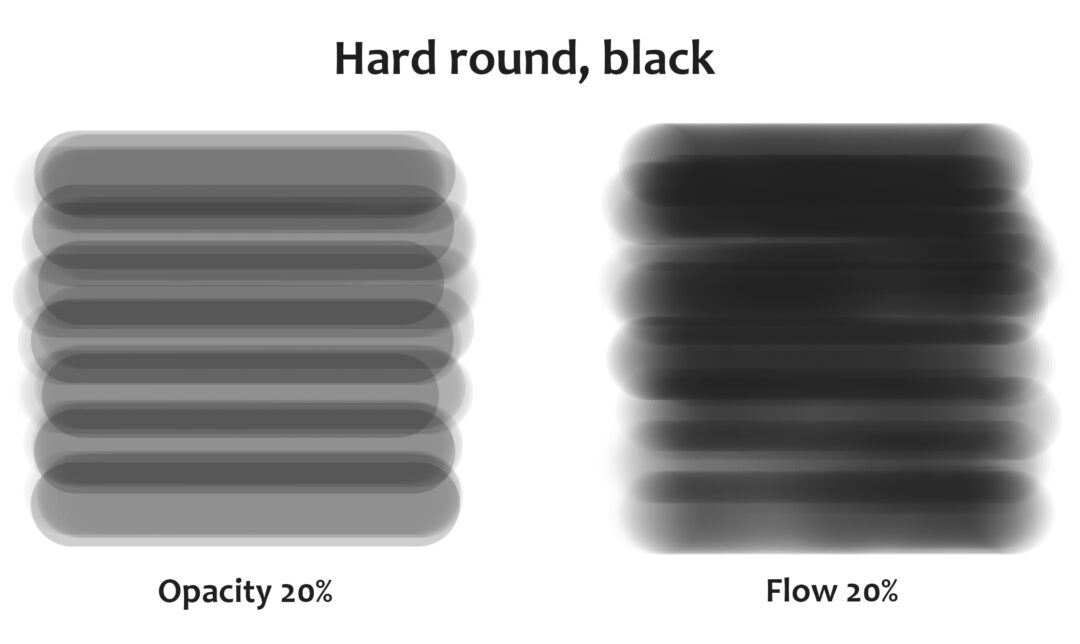
Working with flow feels more “painterly” than opacity: Layering low-opacity strokes on top of each other creates a distinctive pattern of overlapping streaks that’s a hallmark of digital artist. Enough passes and it’ll be less visible, but you’ll almost always get a smoother result with low flow.
While Opacity always works the same way, some media brushes have different Flow functions programmed in to more accurately mimic, for example, how pencils work when you’re only lightly touching the paper, or paintbrushes when they’re nearly dry. With these brushes, as Kyle T. Webster explains in his Photoshop Masterclass, Flow turns into “the rate at which pigment is flowing out of the stylus. If [there’s] a low flow … you’re not depositing very much of it as you’re using it.”
In short, If you’re trying to lay down one translucent coat of paint, turn down the opacity. But if you’re going for a natural painting feel, turn down the flow.
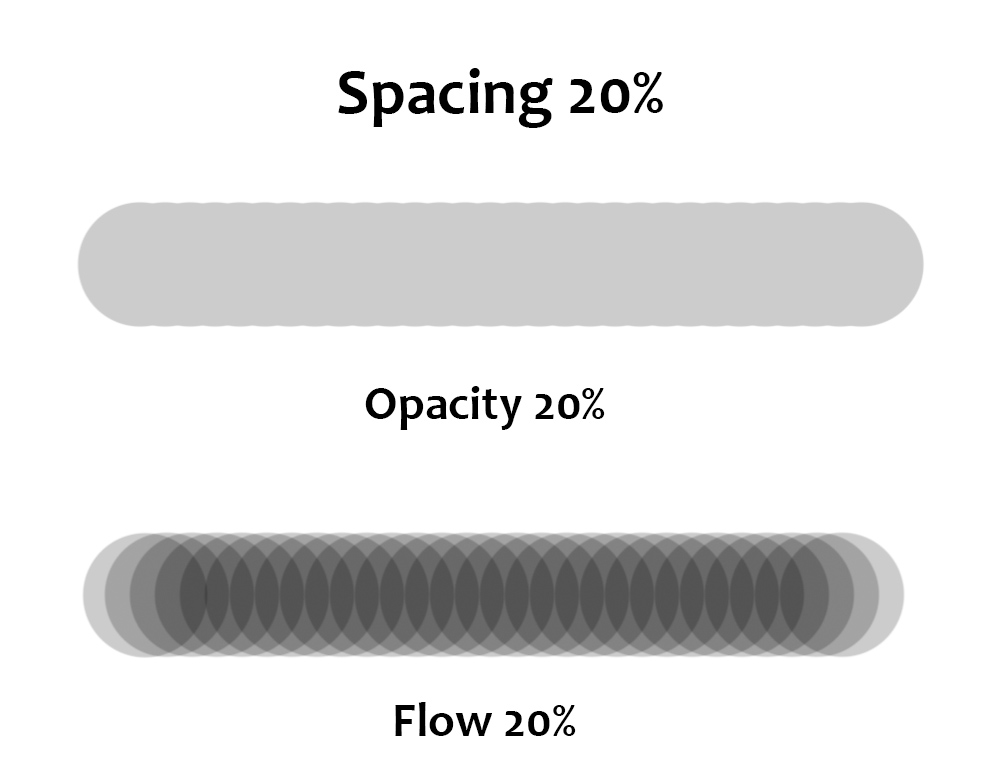
Note: The main exception is when brush spacing is set higher (see above, and more on this in Part 2), in which case lowering the flow will cause the individual layered images to show through each other, but lowering the opacity will look fine.
Always use pressure for opacity
Selecting this causes pen pressure to control opacity. It can be used in conjunction with Always use pressure for size (number 7, later), so that pressure controls both, meaning that low pressure will produce a stroke that’s both small and light-colored, like drawing with a pencil compared to a pen.
If you’re painting, we recommend leaving this off and using pressure to control flow and size instead. The Pressure-Flow control setting is located in the Transfer section of the Brush Settings panel, covered in Pt. 3.
Enable airbrush-style build-up effects

This determines whether the brush will continue painting when it’s not moving. Without it on, turning the flow down and holding your tablet pen in place will produce a single pale dot. With it on, holding the pen will cause it to keep spraying on color until it’s 100% opaque — like an airbrush. If you have this on, the number keys will automatically switch to controlling flow, and shift-typing to opacity.
5. Smoothing

Default smoothing works basically the same way as Clip Studio Paint’s, with a higher percentage producing smoother strokes, but Photoshop’s engine is a little different. It also has a few modifiers. Click the gear to adjust these:
- Pulled String Mode is a little deceptively named; all smoothing in Photoshop uses a pulled string, the length of which increases with the percentage — it’s just invisible by default. Going to Edit > Preferences > Cursors… > Show Brush Leash will make it visible so you can see for yourself how it works. In addition to adding an always-visible leash, Pulled-String mode draws a circle around your cursor; your brush won’t start drawing until it reaches the edge. Increasing the percentage simply widens the circle.
As you pull the circle along, it’ll “average out” your pen’s movements, making your lines butter-smooth no matter how slow you go: at 30%, it gives you smoother strokes than default mode at 100%. This makes it better for people who draw very slowly and deliberately, stopping after each line, and for drawing sharp corners without two separate lines.
- Stroke Catch-up: Photoshop’s smoothing has a quirk Clip Studio Paint’s doesn’t: with this setting off, the brushstroke will always stop short of the cursor’s current position. If you’ve made the Brush Leash visible, you’ll see why, but with this on, the brush will catch up with the pen whenever you hold it still.
- Catch-up on Stroke End: When you lift your pen from the tablet, the brush will draw a straight line from the end of the brush leash to where your cursor was. With Pressure-Size on, this results in every line tapering to a point, so it’s good if you want that effect.
- Adjust for Zoom: This increases smoothing when you zoom out and decreases it when you zoom in, so you’re always drawing at the same level of precision relative to the image size.
You can also set the smoothing percentage with the number keys. This works the same way as setting Flow, except you hold Alt instead of Shift.
6. Brush angle

With this you can san exact brush angle by entering a number in degrees, or clicking the icon and dragging L or R. This is much more precise than the arrow in the Brush Preset Window. Why would you want to change the brush angle? First, it’s invaluable for object or special effect brushes that have to be pointed in a precise direction. But also, if you turn down your brush’s Roundness and turn on Pressure-Size, angled brushes mimic the feel of a calligraphy pen or a chisel-tip marker, where line thickness depends on the direction you pull it in.
7. Always use pressure for size

The Hard Round brush and most others patterned after it always use pressure for size by default, but many others don’t. So if one doesn’t and you want it to, click this. Whatever other settings you also assign to Pen Pressure will still work, but this will force it to also control brush size.
8. Symmetry rulers

This creates a ruler that mirrors your strokes along a horizontal, vertical, other axis. After selecting one, you can place and transform it, then turn it on and off via the Symmetry Off and Last Used Symmetry menu options.
Most of them are pretty straightforward: Vertical, Horizontal, Diagonal, and Curve replicate the drawing once. Dual Axis replicates it in quadrants, and Parallel Lines in columns. Radial and Mandala let you pick a number of axes and replicate it several times around a center point. Circle and Spiral seem to distort your image, but surely must have some kind of use.
That’s it for the Brush Toolbar, but it’s enough to get started painting! Stay tuned for parts 2, 3, and 4 — coming soon.
Bonus information
A few other interesting things that didn’t make it into the basic information about the toolbar itself.
Lazy Nezumi Pro Review
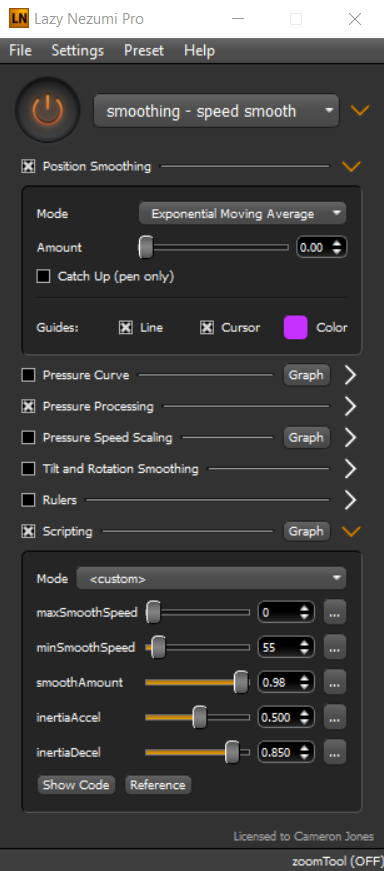
If you have an older version of Photoshop before Adobe integrated brush smoothing into the software, there’s a third-party stabilizer called Lazy Nezumi Pro. It’s $30, so is it worth it when Photoshop includes smoothing? Actually, yes.
The stabilization engine in LNP is much more elaborate than Photoshop’s and nearly any other art program’s. Instead of just a slider and a pulled-string mode, Nezumi offers a choice of twelve smoothing algorithms, each with many fine-tuning options.
There are also also many parallel rulers, perspective rulers, isometric rulers, fisheye rulers, wave rulers, sawtooth rulers, rulers for ellipses and speed lines and spirals and gears … lots of rulers.
A great feature is that it works with any program, not just Photoshop. So if you switch software down the line, it’ll still help. You can use it on Illustrator, Adobe Animate, Toonboom, Krita, Autodesk Sketchbook, and more.
Brush Precision Tip: Turning on the crosshairs
It can be helpful to turn the crosshairs on inside the brush cursor so you can always find the exact center of a weird-shaped tip. To do this, go to Edit > Preferences > Cursors, and check “Show Crosshair in Brush Tip.”
Conclusion
The next installment in this series will be simpler, and will cover the types of brushes you can expect to find, or might need to make, for Photoshop. In Part 3, we’ll tackle the Brush Settings Panel, is where things will get pretty involved.
Some of Part I will seem basic, but other sections might not. The point of going into so much depth is that there are important intricacies to even the simplest brush functions in Photoshop, and knowing them will make digital painting involve way less trial and error. Be sure to stay tuned for the rest of the series, coming soon!
This is Part One in a four-part series. Part Two covers Brush Types, and is available here. Part Three covers the Brush Settings Panel, and is available here. Part Four covers making your own brushes, and is available here.

About the Author
Cameron “C.S.” Jones is a West-Philly-based writer and illustrator who’s been contributing to Wacom for four years now. You can see more of his work, including most of his contributions to this blog, at thecsjones.com, or follow him on Instagram or Twitter.
