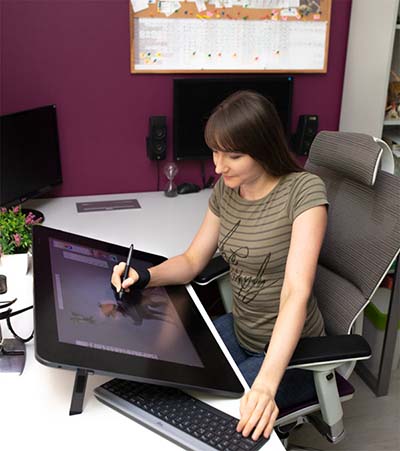
Monika Zagrobelna is a Polish artist with a great passion for creating new things — whether by drawing, digital painting, or photo manipulation. She specializes in creating realistic art, especially of animals, and is a big fan of dragons and feline creatures!
She loves sharing her skills with others, including on her blog and social media accounts. Check her out on X (Twitter), Facebook, LinkedIn, Instagram, or on her website.
In this extremely detailed tutorial, she walks step-by-step through her process for drawing a “realistic” dragon.
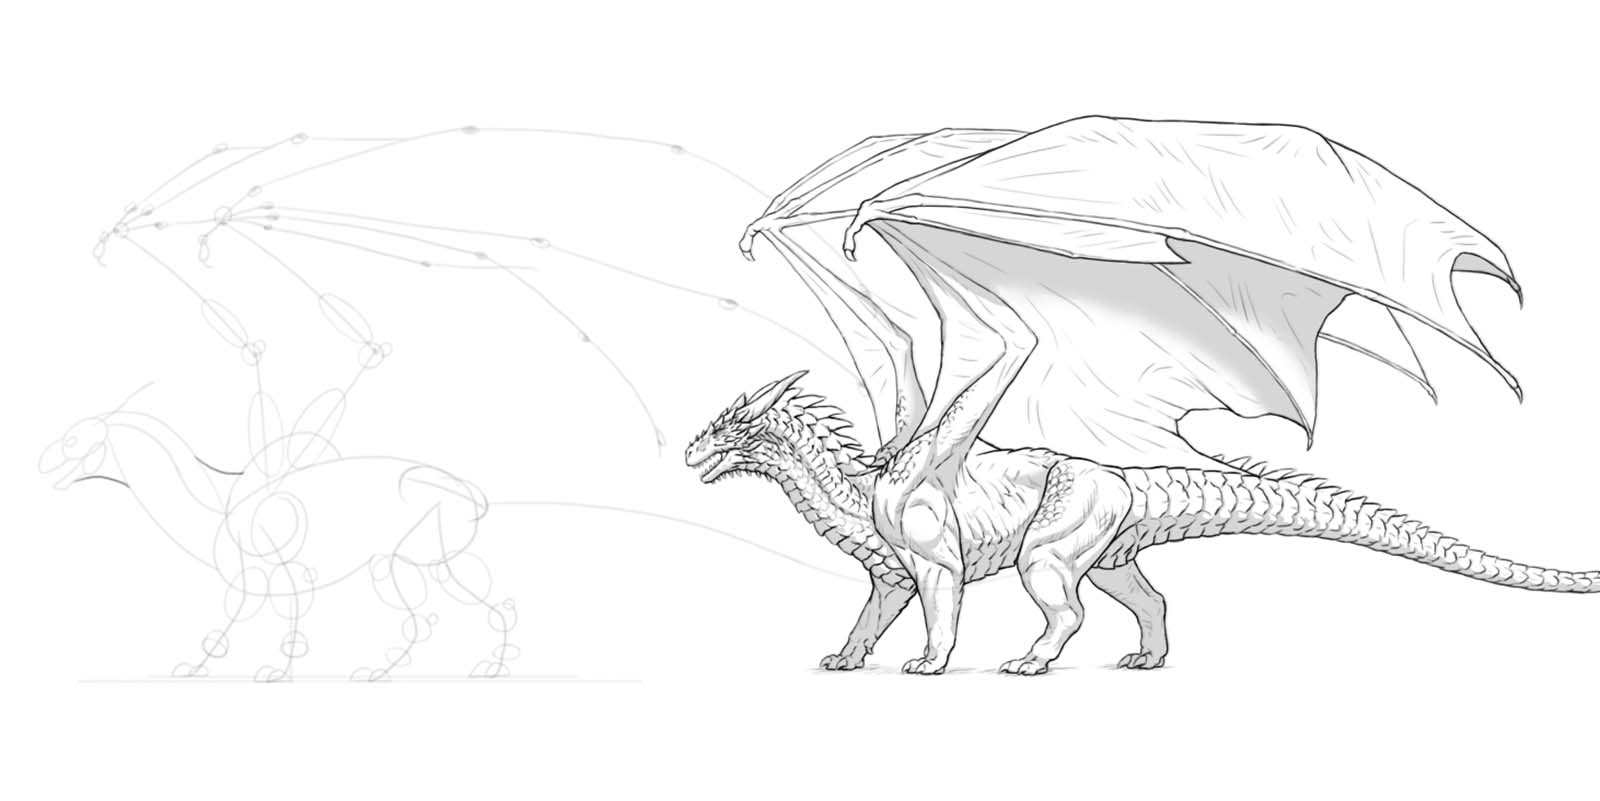
Dragons are amazing, there’s no doubt about it! And in this tutorial I’ll show you how to draw such a magnificent beast from start to finish—complete with wings and scales. You’ll learn basic dragon anatomy and proportions, so after this lesson, you’ll be able to design your own dragons from scratch, too!
Keep in mind that we’re going to be drawing a classic, DnD-type dragon, with six limbs—four legs and two wings. If you want to draw a wyvern-type dragon (two legs, two wings), this instruction will still be helpful, but you’ll need to modify a couple of steps to create a desired effect.

1. How to Create the Body Plan of a Dragon
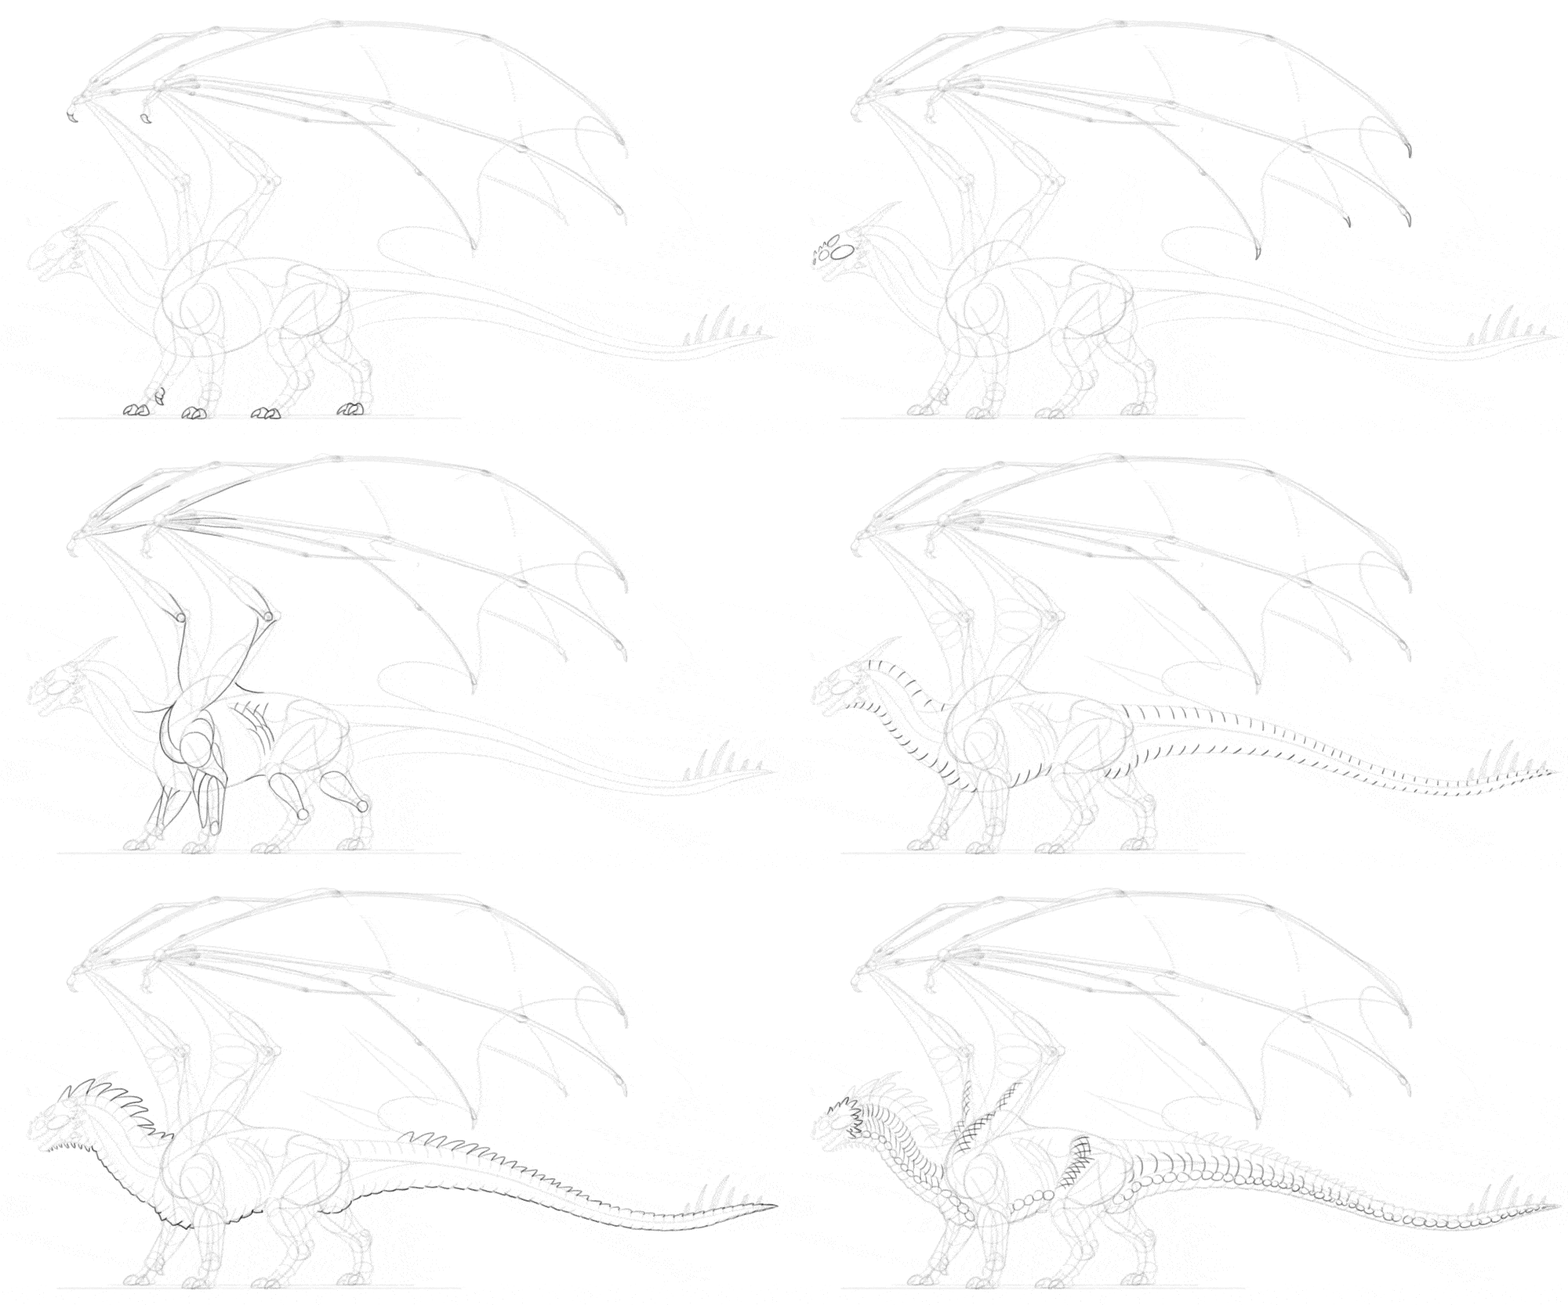
It’s important to capture the basic proportions as early as possible, before adding any details. First, draw the torso. It looks a bit like a bean, with a bigger front part (the chest) and a smaller back part (the hips). Tilting the chest down will give us some space for the big wing muscles over the shoulders.
Keep these first lines fairly thick—the smaller the brush, the more precise it feels, but in this early stage precision isn’t welcome. You’re drawing a very general idea of the subject at this point, and broad strokes will help you see the big picture. Leave a lot of space on the canvas for the wings and the long tail.
Add a line under the body to define the level of the ground. Keep the distance between the body and the ground fairly short—this will give your dragon lion- or tiger-like proportions. Add another line slightly higher. This will help us create an illusion of perspective, despite drawing a simple side-view pose.
Add the curves of the legs. Imagine them like your own limbs—the front ones should bend at the elbow and the wrist, and the hind ones should bend at the knees and ankles (with the feet in the tip-toeing position). If you’re drawing a wyvern-type dragon, make sure to keep the knees close to the middle of the body—unless you decide to use the wings as the front pair of limbs! Keep the closer part of limbs on the first ground line, and the second pair on the second one.
Let’s sketch the neck now! It should be long and curved, but it must curve in a specific way to look realistic. First, draw this concave-upward curve starting at the front of the chest. Then, attach a similar, but concave-downward curve to its tip. Add a simple oval for the head, slightly tilted. This will allow the dragon to look forward without the muzzle standing in the way.
Add simple jaws. Keeping the mouth slightly open will give the dragon an alert expression. Let’s draw the curved tail the same way we drew the neck. First a concave-downward curve … then a shorter concave-upward curve … and finally, a short concave-downward curve. Keep the tail at least as long as the rest of the body.
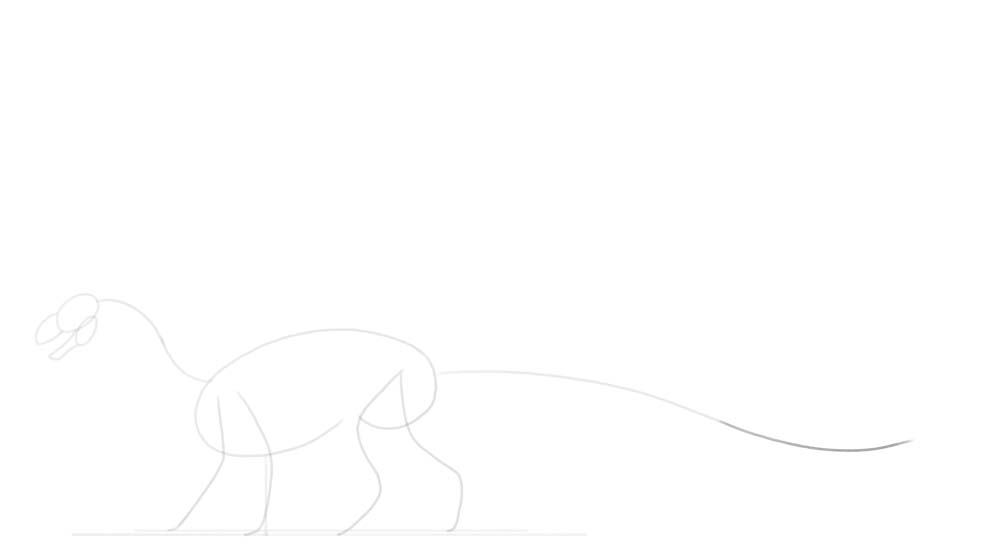
Now, add the shoulders and the hips. The shoulders should be huge, because they must be heavily muscled to carry the weight of the wings.
Time for the wings! If you’re drawing a wyvern-type dragon, you may want to draw the wings in the opposite direction—pointing towards the ground, to be used as front legs. Otherwise, draw these two lines pointing upward, creating a sort of a “V” shape. Add the second segment of the wing—a forearm with the big thumb at the tip.
Add the three, long “fingers.” Just like your fingers, they should bend in three places: first, right at the palm, and then twice along their whole length. You can also add a curved claw at the tip.
It may be hard to imagine the perspective at this point, but imagine they middle one is the closest to us, then the top one is slightly farther, and the bottom one is the farthest.
You can draw the fingers of the second wing entirely, but you can also visually copy the previous shape and save yourself some time. Also, add the last, little finger to the previous wing. Now the wing has all five fingers, the same way bats do. But keep in mind that this is a fantastical creature, so if you think it would look better with more fingers, go for it!
Finally, add an eye socket to the front of the head, right before the muzzle. Add a long, curved horn as well.
2. How to Add Basic Volume to The Body
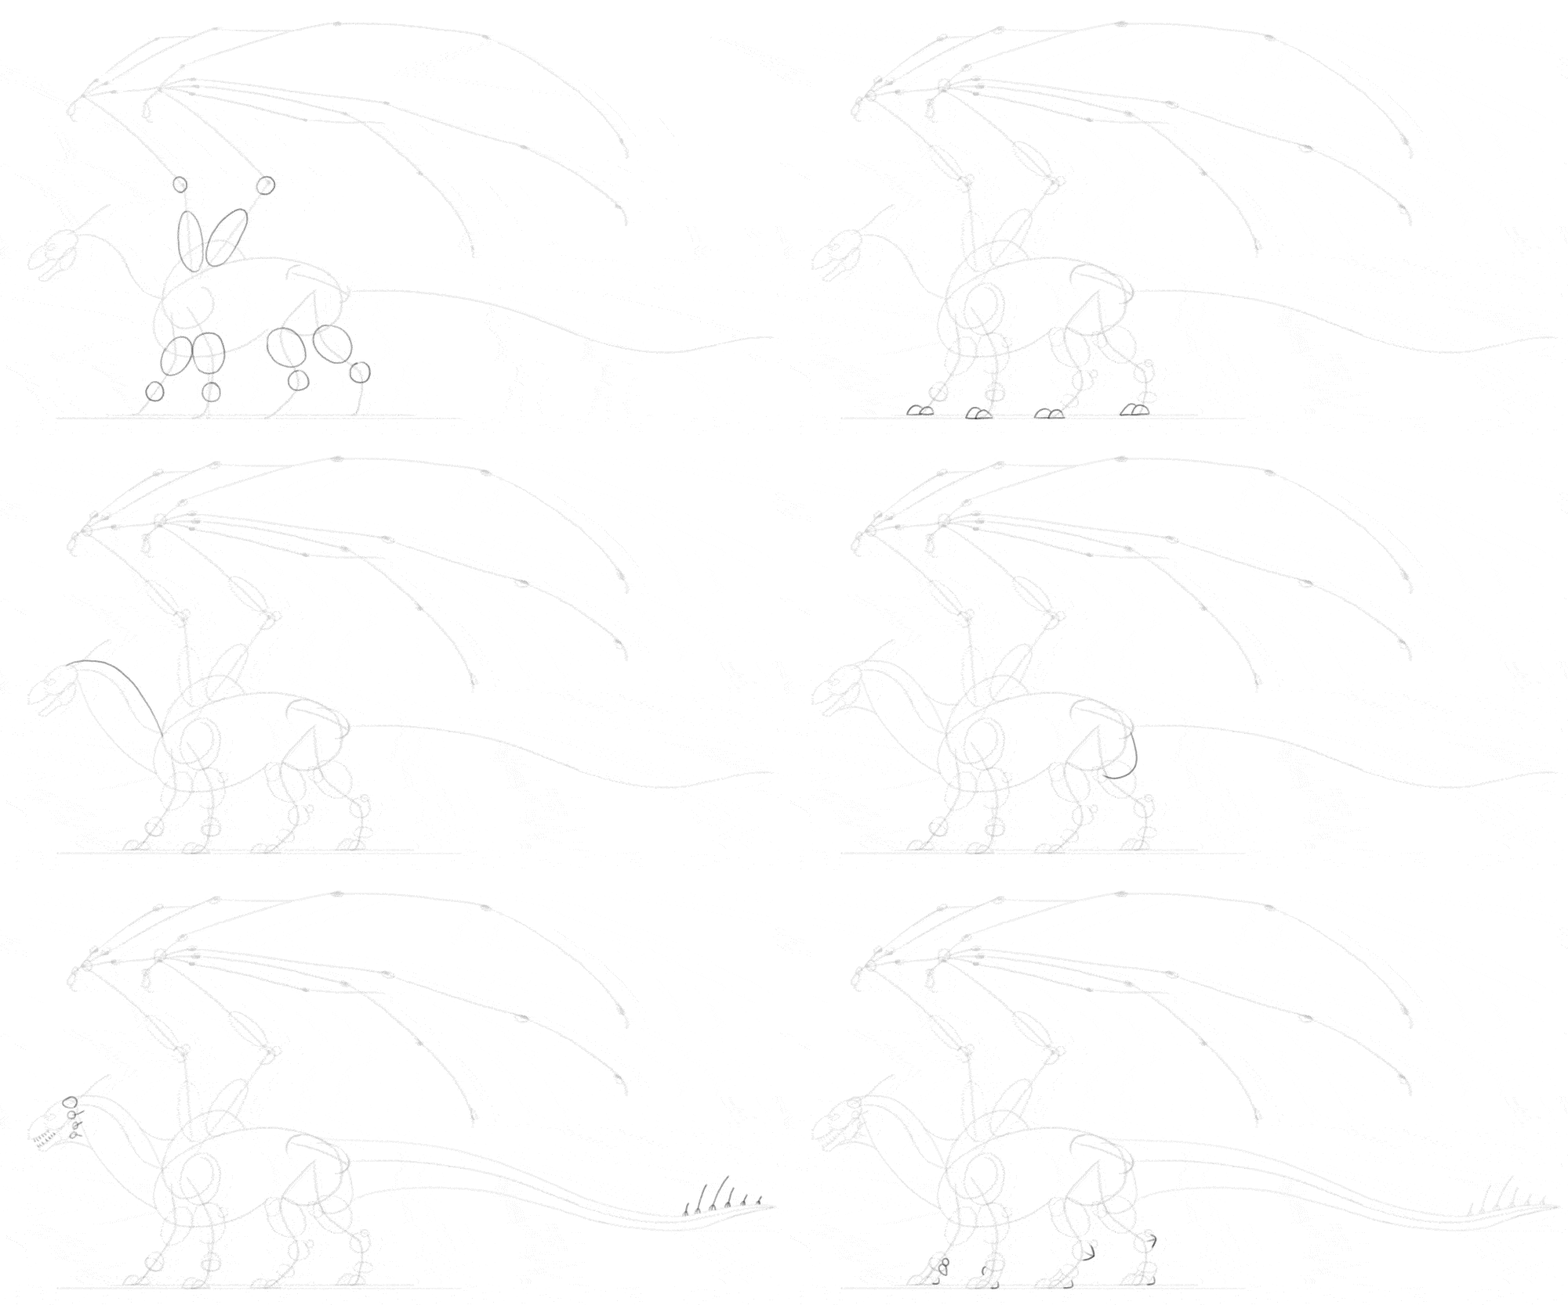
Now we’re going to cover this bare “skeleton” with a bit of body, but without going into any anatomical details yet. First, add circles to the wrists, ankles, and the elbows of the wings. Drawing simple ovals over them will quickly add volume to the limbs.
Add smaller joints now—the tip of the elbow, the knee, the heel, and the finger knuckles. Adding a horizontal oval right over the (intended) toes will help you create the characteristic skin fold in this area. Also, mark the shoulder and the top of the hips. Add two little domes at the feet, creating a basic outline of the toes. Most dinosaurs had three main toes (with a smaller one on the inner side, like a thumb), so in the perspective you can just draw two—because the third one will be covered.
Let’s draw the neck volume now. The dragon neck must be thick and strong, to give an impression of a T-Rex. First, draw a long curve connecting the front of the chest to the back of the head. Add another curve on top, from the top of the head to the beginning of the neck. Finish the shape of the neck by creating a curve at the throat, and one more right before the wing shoulder.
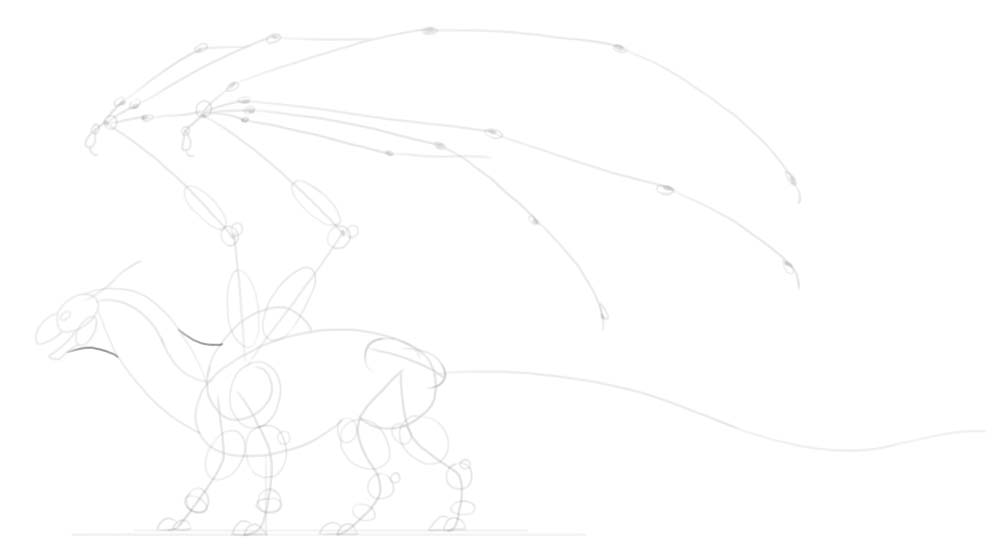
Dinosaurs have very characteristic hips, with two long bones under the upper part: one pointing forward, and one pointing backward. The former will be covered by the leg in our case, but we need to draw the latter. It will serve as an attachment point for the long tail! Speaking of the tail, draw its outline now, following the curve we’ve established earlier. If you want to keep your dragon more realistic, you can slightly flatten/widen the tip of the tail, to make it more useful for steering.
Plan the spikes and teeth now—no details yet, just their direction and volume. A set of spikes along the tip of the tail will easily make this area look more detailed. Sketch the outline of the toes now, keeping them quite thick. Add the paw pads under the toes, as well as the thumb claw. Adding an angle to the ankle ovals will help you draw them correctly later.
3. How to Draw the Anatomy of the Dragon
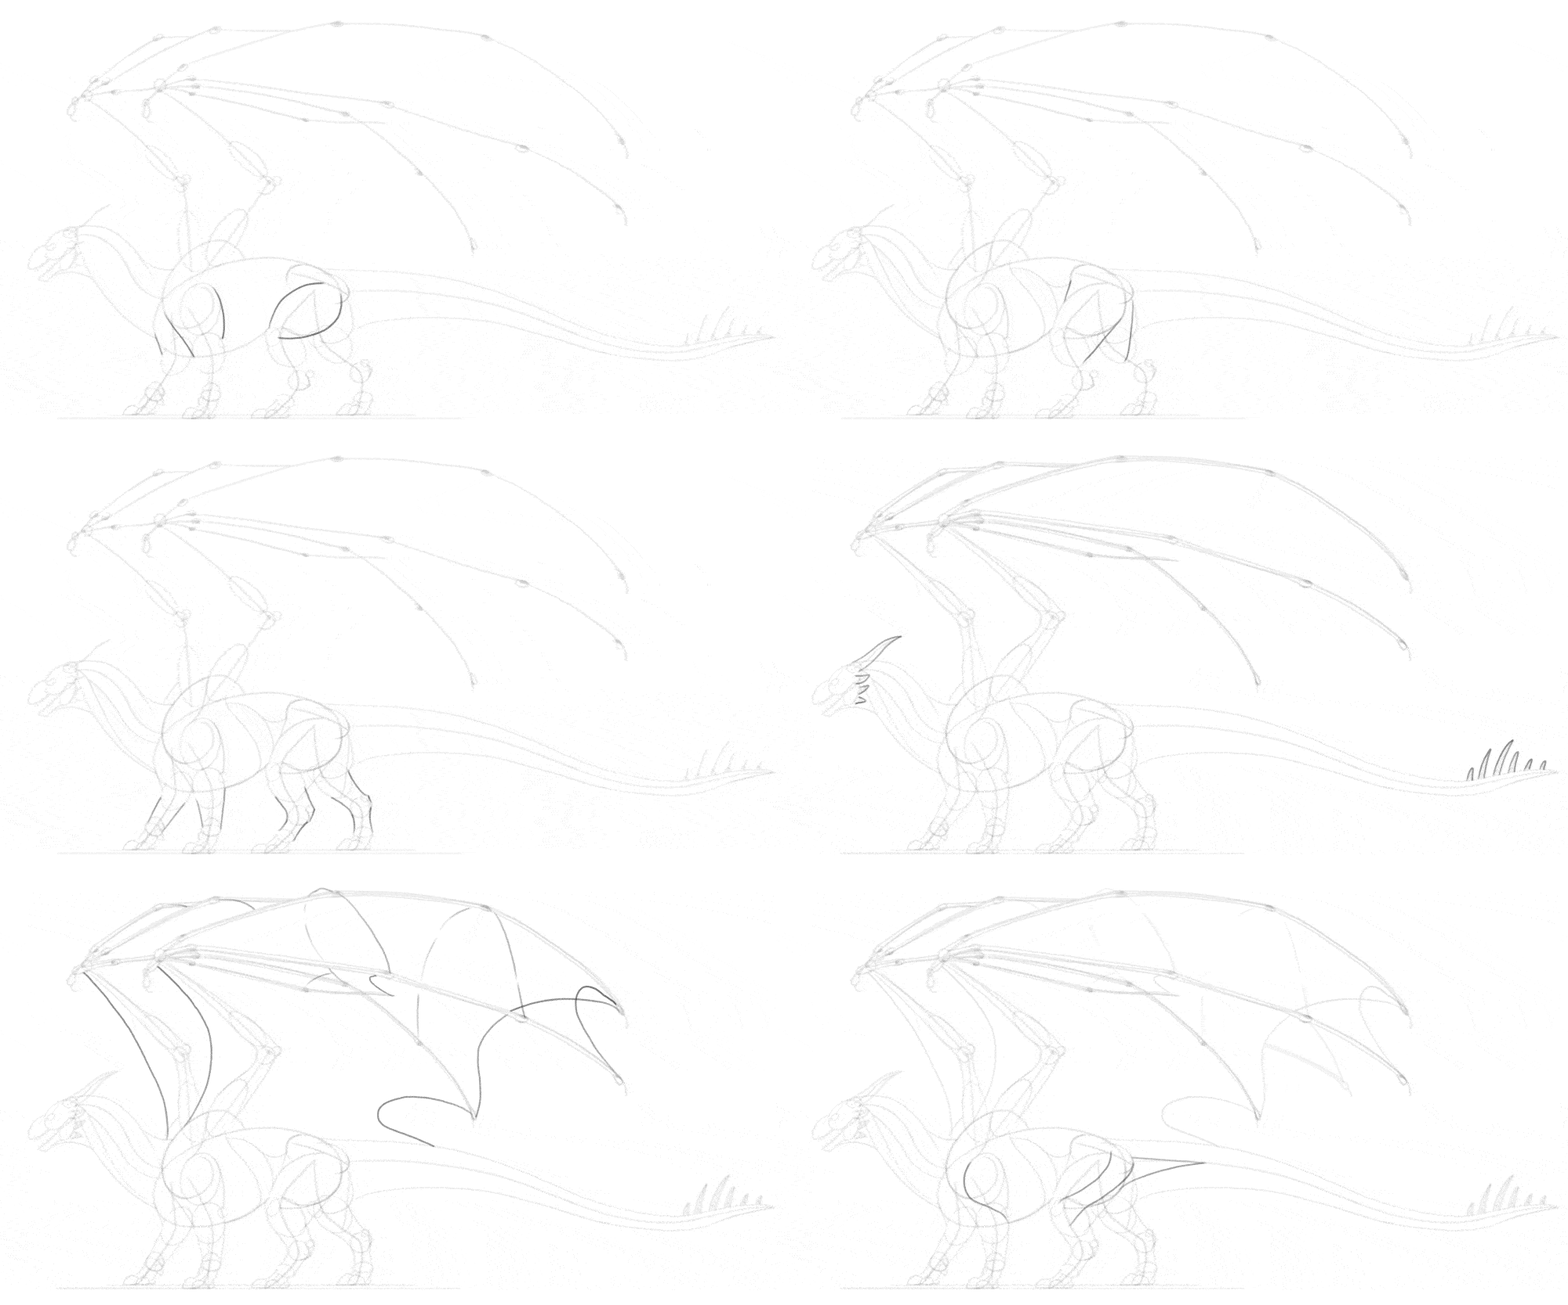
Our sketch definitely looks like a dragon now, but there are still certain areas that need to be filled to make it less skeletal. First, add the “muscles” of the arm and thigh, connecting the previously drawn volumes.
Mark the outline of shoulder muscles, the neck muscles, and the torso muscles. They don’t have to look exactly like this, because there isn’t really one correct dragon anatomy diagram that everyone must follow. However, these lines are designed to make these parts look similar to dinosaur and bird anatomy. Finish the outline of the thighs by adding these extra muscles.
Outline the rest of the legs, “shrink-wrapping” the previously established volumes. Outline the wings in a similar way. Outline the horns and spikes with gentle curves. Don’t make their tips too sharp—it wouldn’t look natural.
Spread the membrane of the wings between the wing fingers. Imagine how it connects the respective knuckles of each finger, and it should help you get the perspective right. Add a hint of the other wing behind the first wing. You don’t have to sketch it as a whole, just try to imagine where it should be. Add some extra muscle lines along the shoulder, thigh, and tail.
4. How to Add the Details to The Dragon Body
The body is almost complete now, but it will look more realistic if we add a couple of details. First, draw the claws inside the toe-tips volumes we drew earlier. Make them slightly curved, and not too sharp. Add a few extra volumes to the head, to create a foundation for further details. Add long claws to the wing fingers, too.
If you want the muscles too look realistic, you need to add some more detail to them. This isn’t necessary, especially if you plan to cover the whole body with big scales—but if you add a detailed anatomy, using lots of scales will not be necessary. Because the wings are folded, and they’re quite big, it’s likely that skin folds will appear here and there. Here’s how you can plan them:
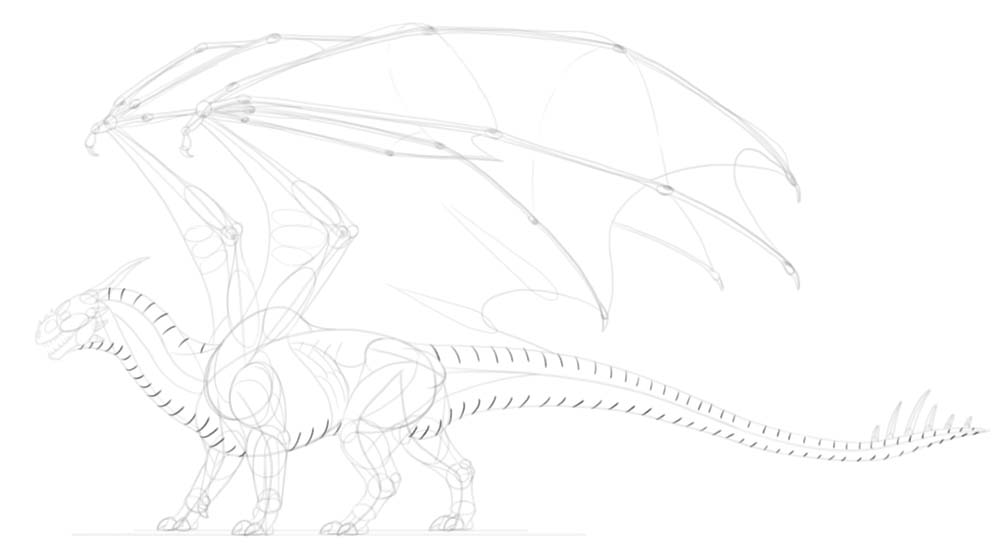
Time to plan the scales! First, sketch their “rhythm” along the upper and lower part of the body. Then, attach a big scale between each pair of lines in the series. You can make them flat, or very prominent—that’s your choice! If you want to add more scales to the body, you can plan them with various methods. Here are a couple of propositions that you can experiment with. On the head, the small scales can suddenly turn into small horns/spikes.
5. How to Draw the Final Lines
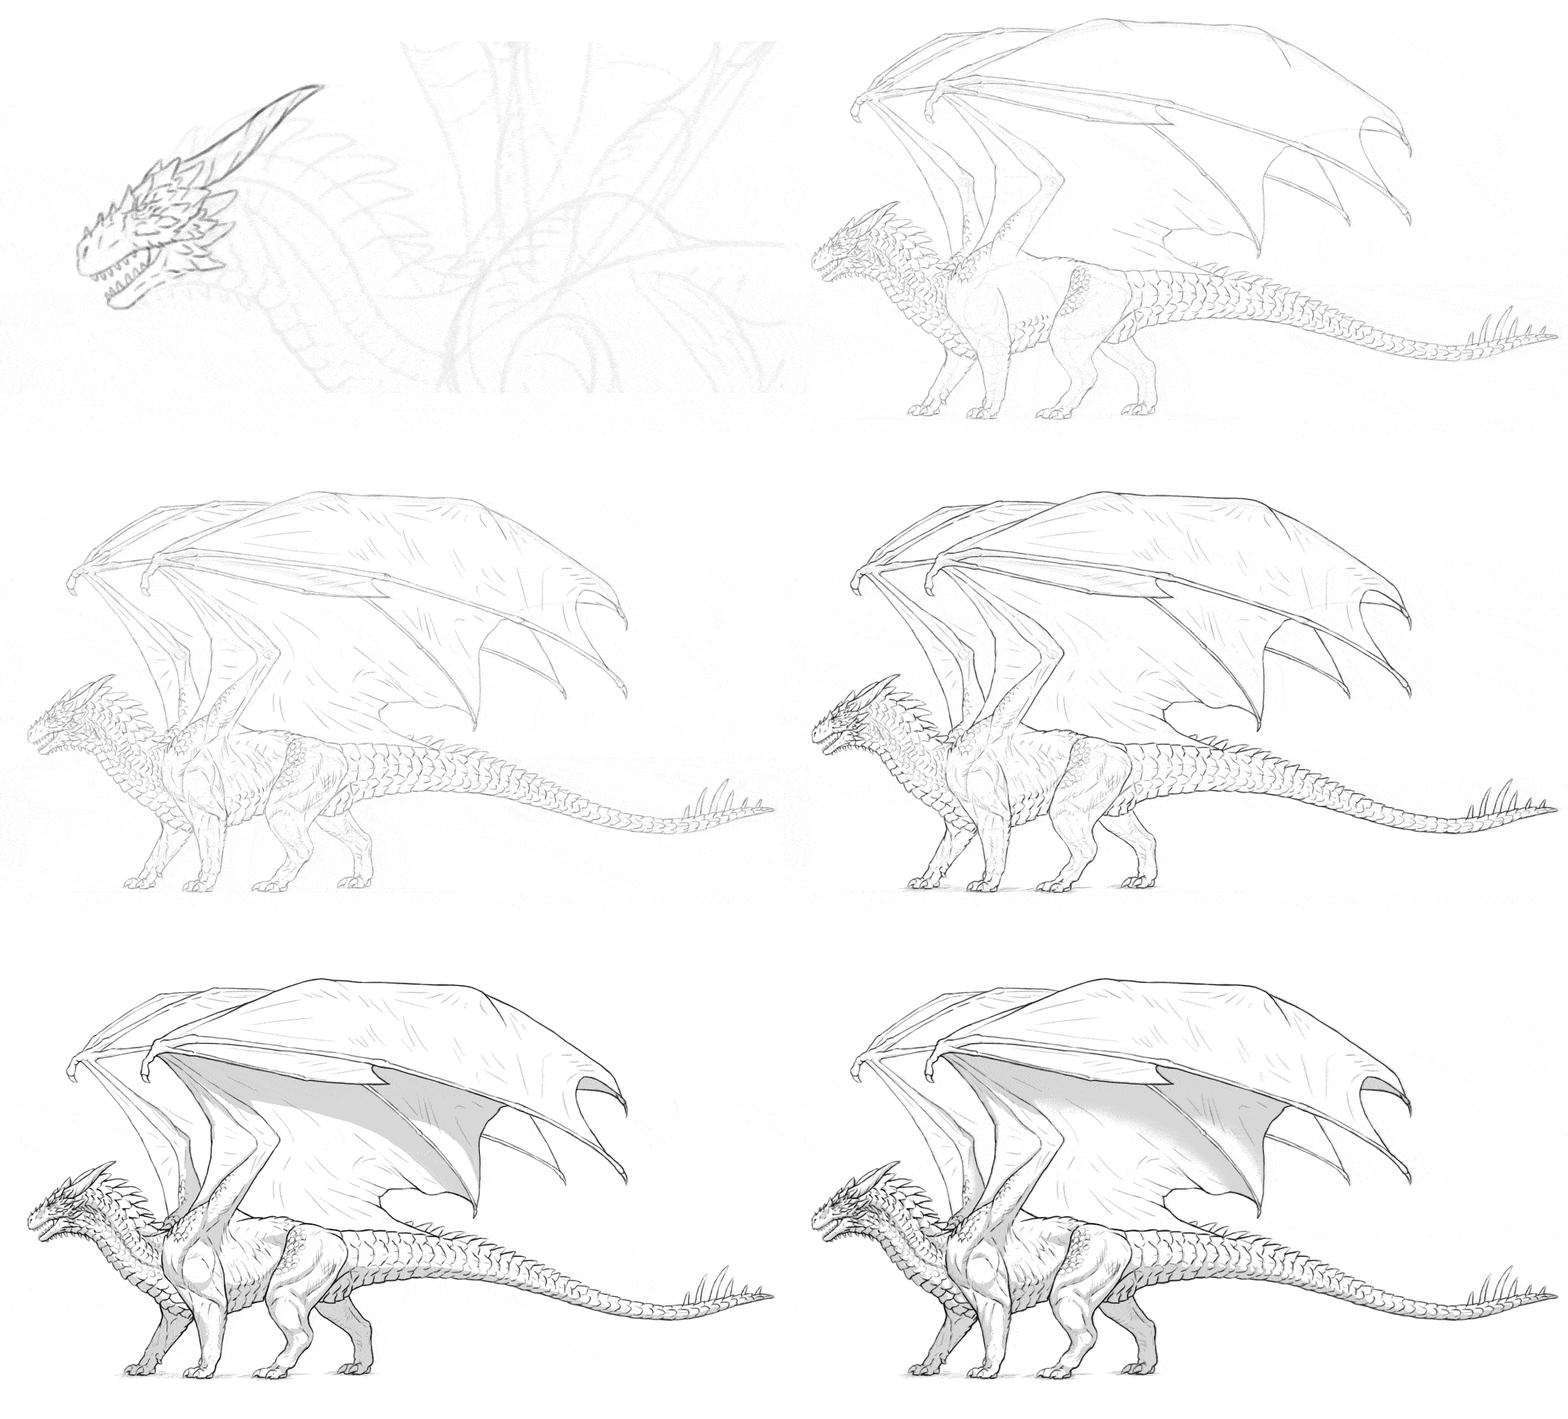
Ok, the sketch is done, time to add the final lines! Before you do this, make sure to lower the Opacity of the sketch, and create a New Layer over it. You can now make your brush smaller and more precise.
Start with the head. Be careful not too zoom in too much—you don’t want the head to look much detailed than the rest of the body, otherwise the latter will look unfinished. Keep your lines light and even a little shaky, to simulate the rough surface of the scales. Outline the top and bottom scales. Make sure that each one is slightly different that the previous one. Outline the rest of the body with minimal detail.
At the secondary scales now, if you’d like. They don’t have to lock into each other—in fact, if you avoid it, then the whole style will look looser, and leaving other parts scaleless will not look as distracting. Use short, gentle lines to accentuate the volume of the muscles. Use similar lines to show how the membrane of the wings is stretched between the fingers. To make the scaleless areas of the body look less empty, you can add some hatching here and there, to suggest a texture of the skin. Add some shadow under the feet with simple hatching.
The drawing is basically done, and finishing it further is just a matter of style. You can keep following my steps, or just finish it the way you prefer—it’s your choice!
If you decide to follow my instructions, accentuate the main outline of the body by thickening these lines. Just don’t do it continuously—leaving the tapered lines lighter will make the horns, spikes, and long scales look less “blocky”. You can accentuate some lines within the outline of the body as well, but do it even less continuously—focus on the places where two lines come in contact with each other, or the places where you’d expect a shadow to appear. After tips part, you can come back to the main outline and darken specific parts of it even more, to bring more attention to them.
Now, if you want, you can add some basic shading to the body. To do this, create a New Layer under the line art. Hide the sketch layer. Use a hard brush and light grey to accentuate these areas of the body:
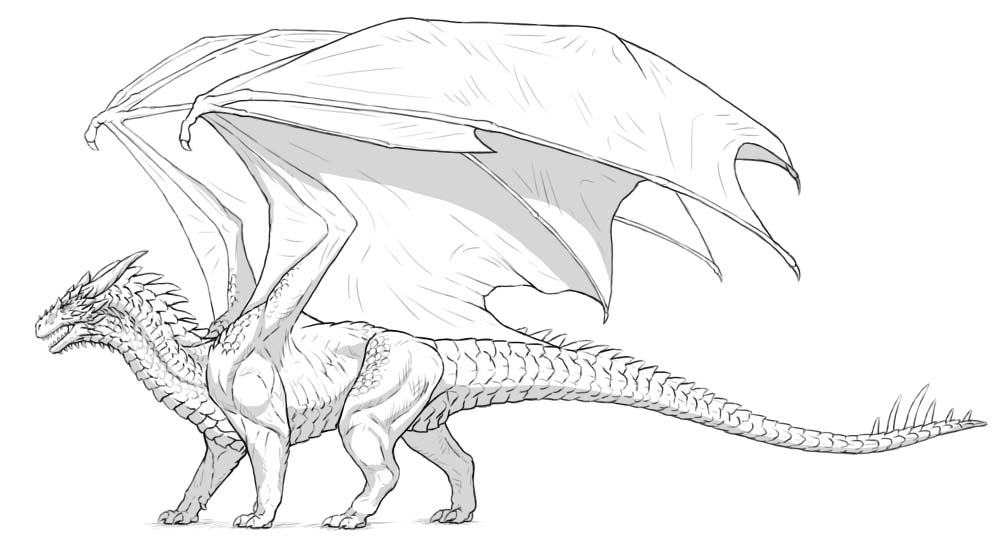
Since the body of our dragon is not perfectly smooth, you shouldn’t leave shading this simple. Instead, add smaller shadows at the border of the main shadow, between the scales and smaller parts of anatomy. This will create an illusion of texture. Take a blending/smudge brush and soften the bigger shadows. This will create the effect of light falloff.
There’s an extra trick that you can use at the end, although it’s quite subtle. Duplicate the line art layer, and put it on top. Move it slightly to the side, just a few pixels away from the original. Then change its Blend Mode to Multiply, and it’s Opacity to 10%. This should add a subtle blur near the outline, making it look slightly more detailed.
You can keep adding more detailed shading (and coloring!) after this point, but keep in mind that the more similar to a painting you make it, the more lacking it will look—because it will stop looking like a finished drawing, and will start looking like an unfinished painting instead. So adding colors and shading is not really a “finishing touch”—it’s more like a separate stage that you may decide or not to enter.
